

Claude Code. No code required.
A step-by-step guide for professionals who’ve never touched a terminal - and never should have to.

I put this off for weeks.
Every time a developer friend showed me Claude Code, they’d open something called a “terminal” - a black screen with white text - and start talking about GitHub, repositories, and pushing commits. I smiled and nodded. Inside I was thinking: this is not for me.
I’m not technical. I don’t code. And I wasn’t about to spend three weekends learning things I didn’t understand just to try a new tool.
Then I decided to figure it out myself. No developer friends. No terminal. No GitHub. Just me, a few hours, and a lot of stubbornness.
Turns out it’s much simpler than they made it look. I documented every step so you don’t have to go through what I did.
If you’ve been putting this off because it felt too technical, this one’s for you.
What is Claude Code, actually?
It’s an AI that lives inside your code editor and builds things for you.
You type: “Create a website for my consulting firm.” It writes the code, creates the files, and does the work. You stay in charge of the direction. Claude handles the execution.
Think of it like hiring a very fast, very literal assistant who never sleeps and never charges by the hour.
What you need before you start
Three things. That’s it.
A paid Claude account.
Go to claude.ai and sign up for Pro ($20/month). You need this to use Claude Code. The free plan won’t work here.
Visual Studio Code (VS Code).
This is your workspace - the program where Claude will do its work. Go to code.visualstudio.com, download it for free, and install it. Think of it like Google Docs, but for building software.
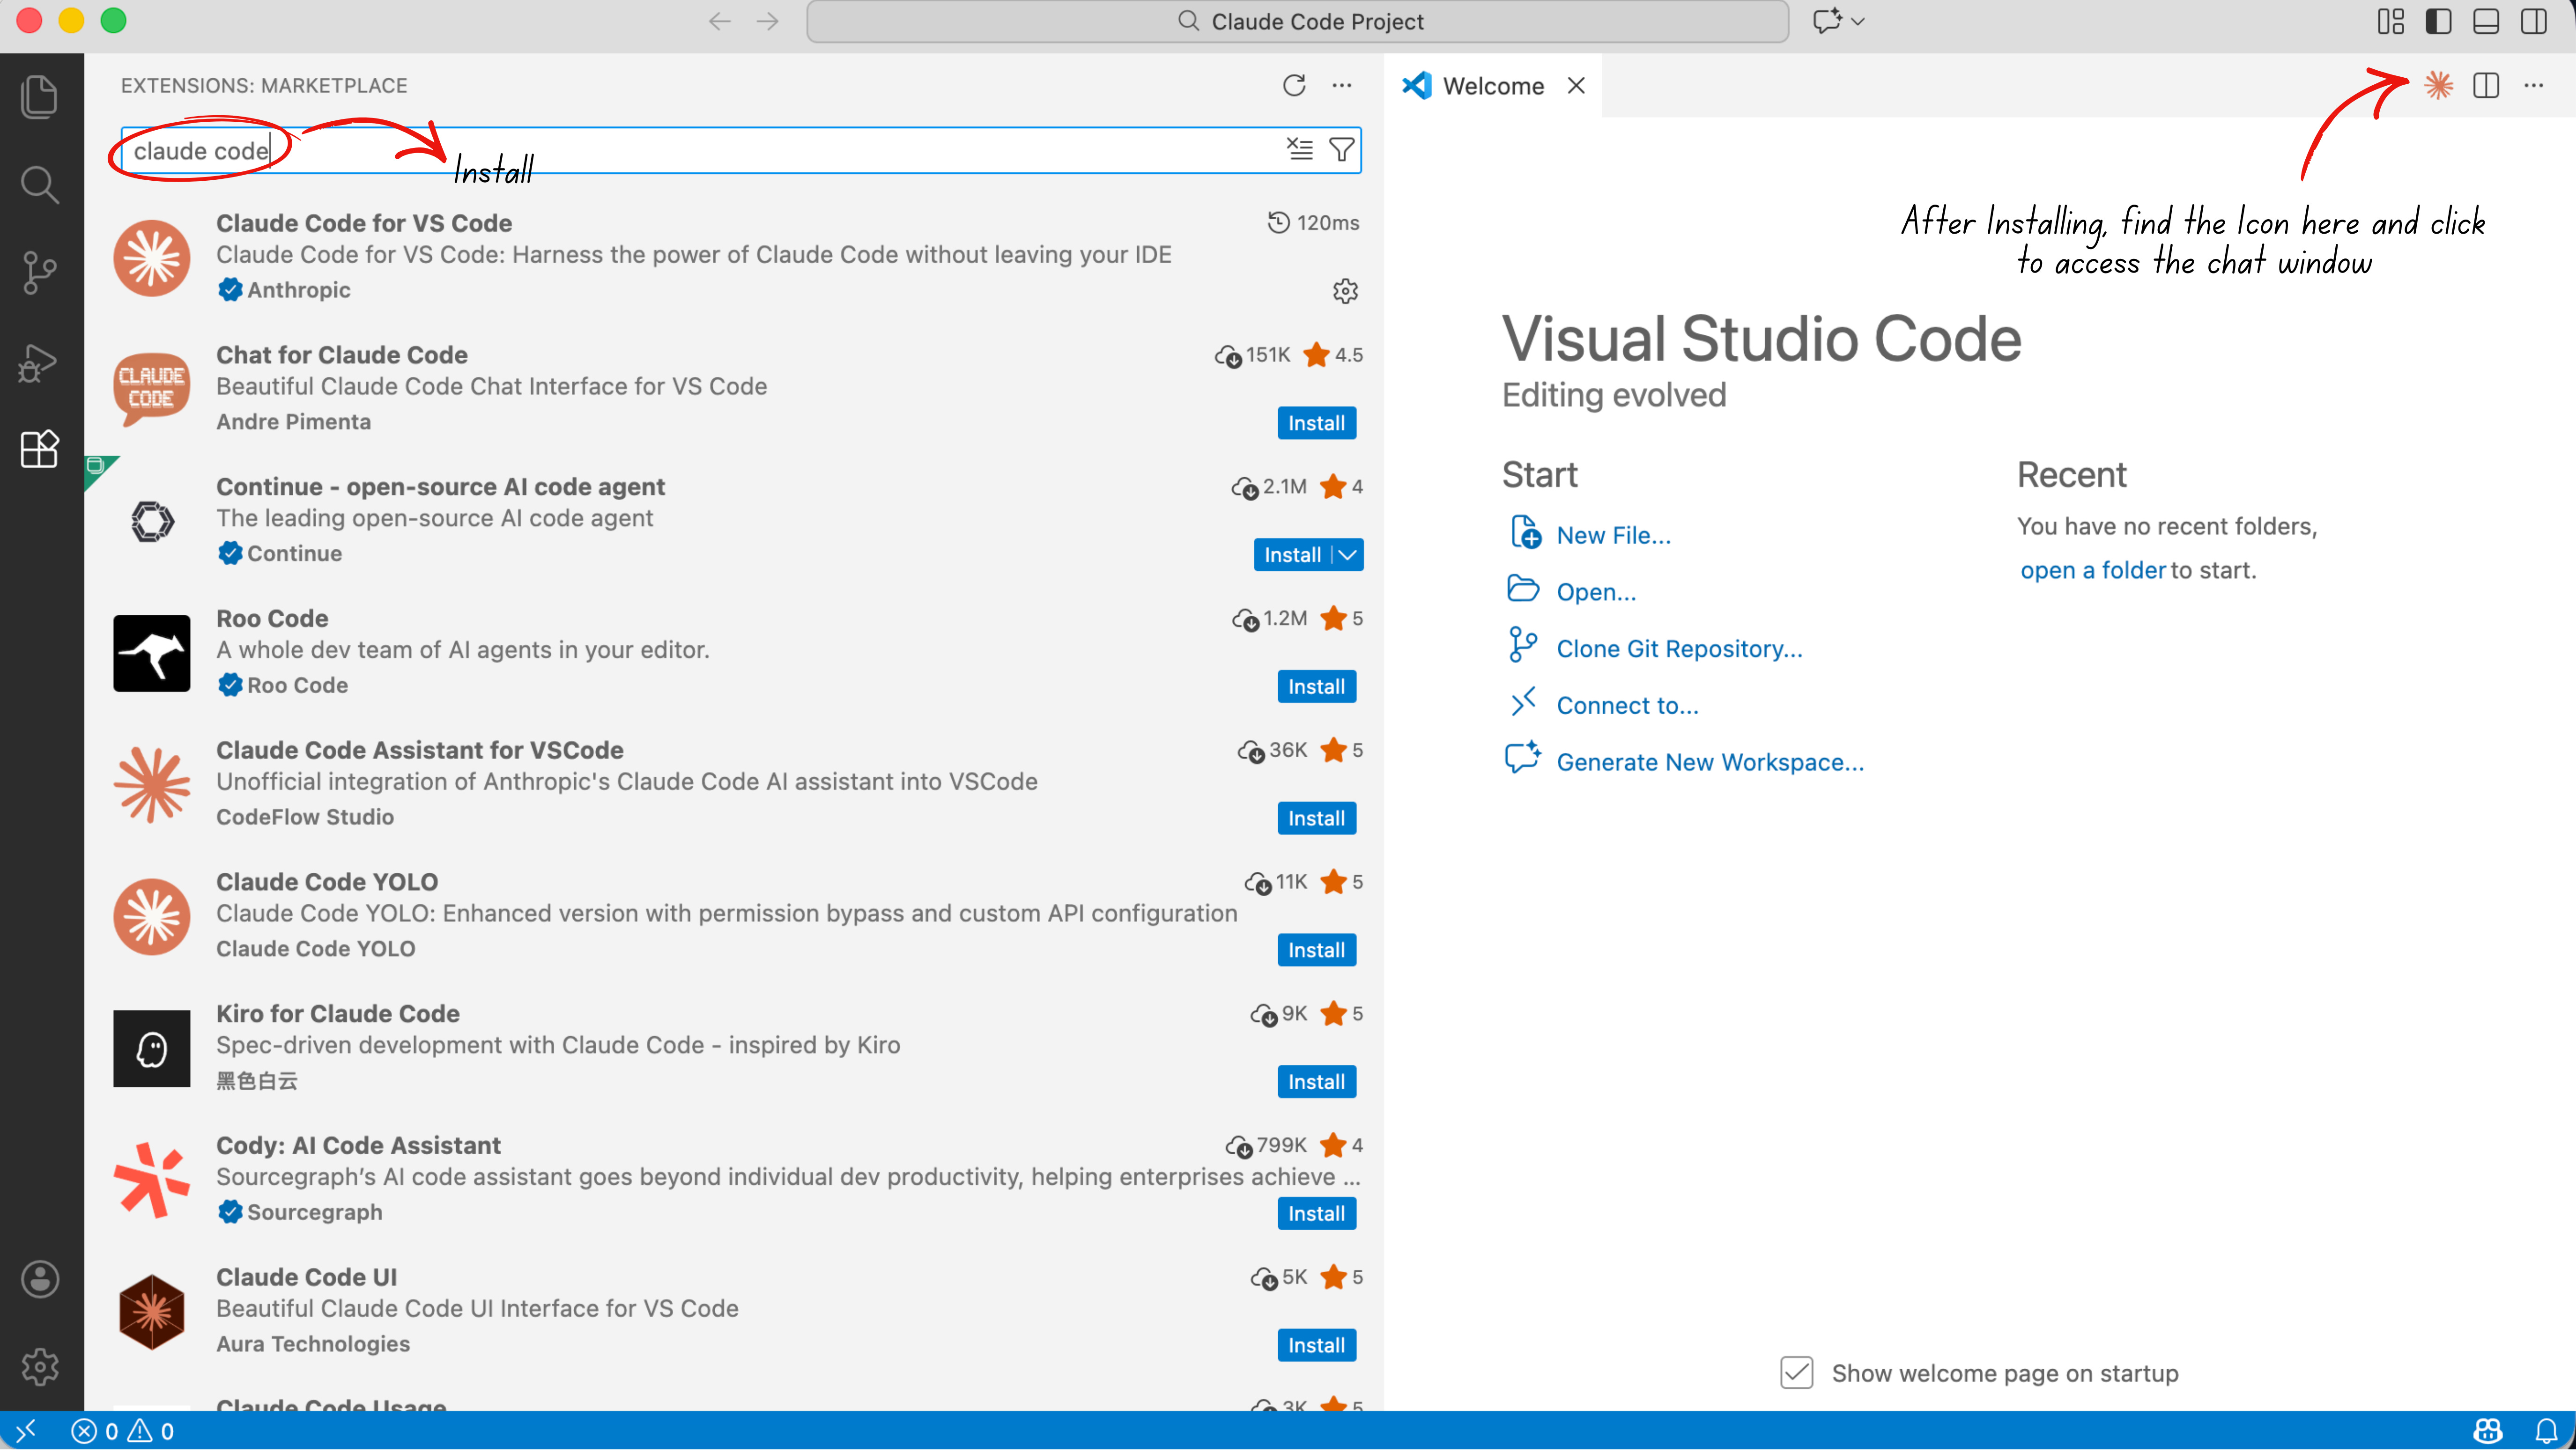
The Claude Code extension.
Open VS Code. Click the four-squares icon on the left sidebar (that’s the Extensions tab). Search “Claude Code.” Install the one with the orange logo.
Log in and set up your workspace
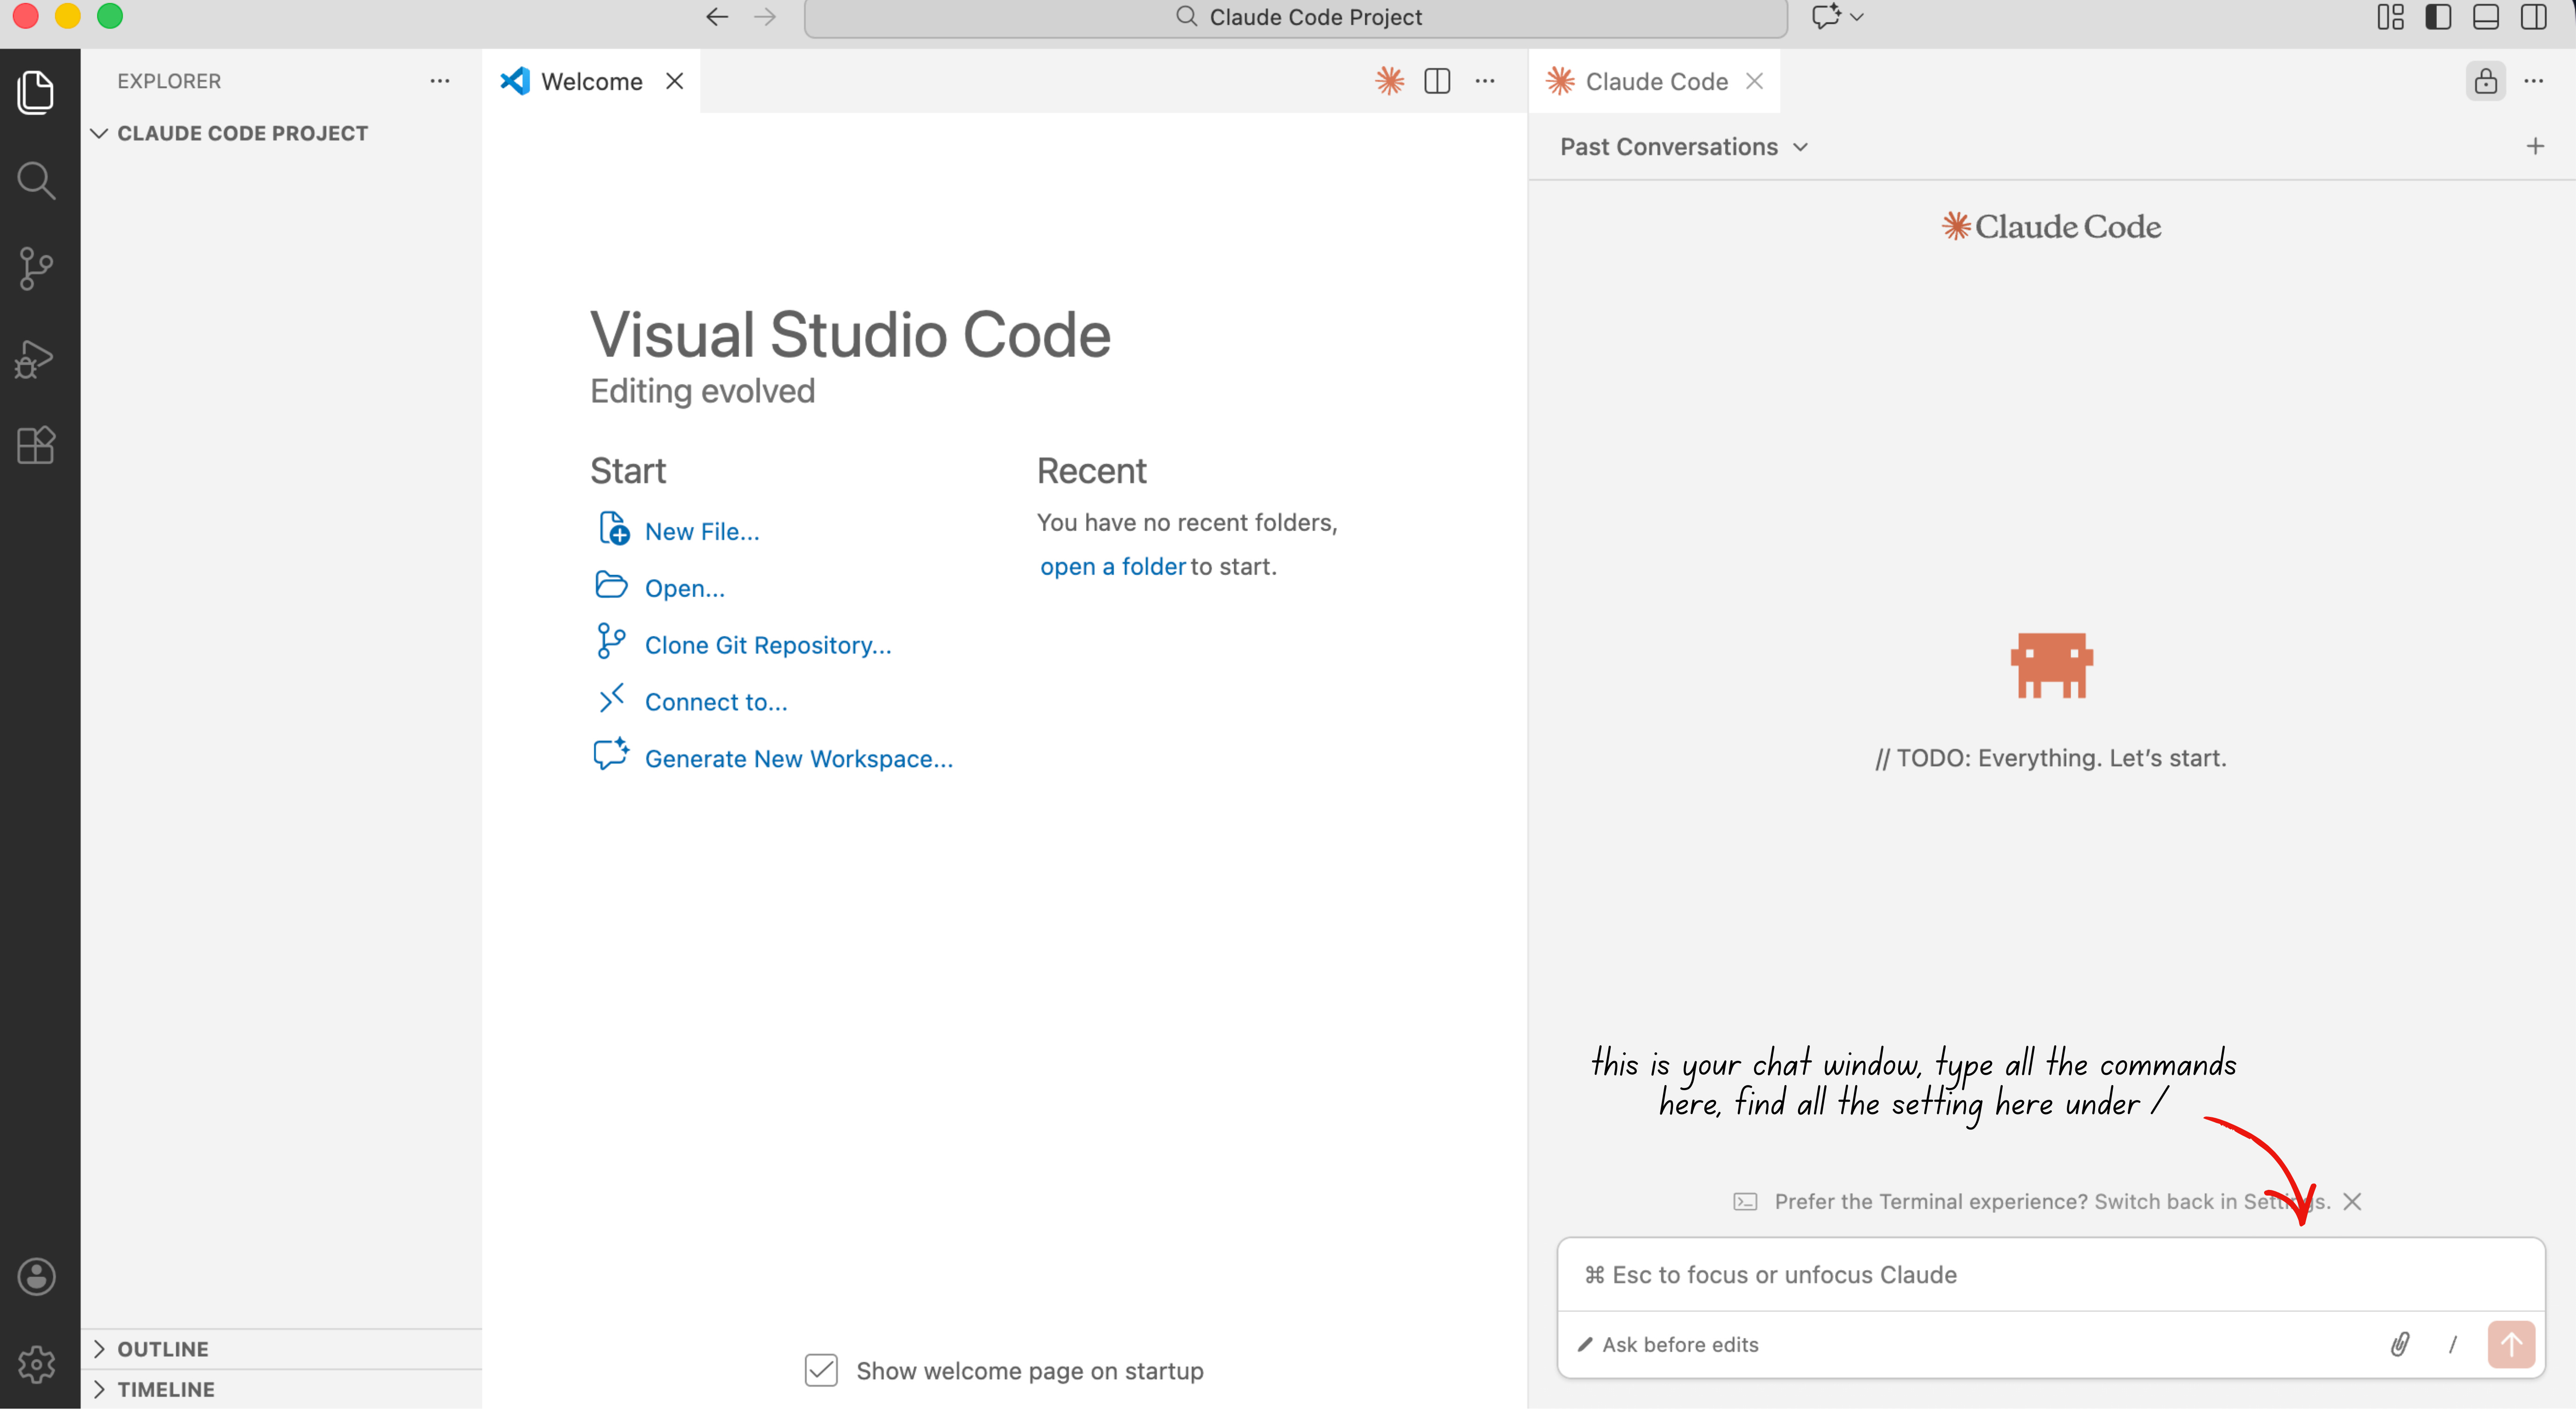
Click the Claude icon that appeared in your VS Code sidebar after installing the extension.
Type
/loginin the chat box. A browser window will open. Click “Authorize.” Your computer is now connected to Claude.
Now create a folder on your desktop.
Name it anything - “My First Project” works fine.
In VS Code, go to File → Open Folder, and select that folder. This is Claude’s room. Everything it builds will live here.
A quick note on GitHub (don’t worry, we’re not going there today):
developers use something called GitHub to save and back up their projects online - like Google Drive, but for code. It also lets you track every change ever made to your project, which is incredibly useful. I’ll write a full beginner’s guide to connecting Claude Code to GitHub in the next article. For now, your desktop folder is all you need.
The permissions problem (and how to fix it)
Out of the box, Claude asks for permission before doing almost anything.
“Can I read this file?” “Can I search the web?” “Can I create this folder?” It gets old fast.
The fix is simple. Paste this into the Claude chat box once:
Add permissions to this Claude Code project to allow non-destructive bash commands, file reads, and web searches without asking for confirmation each time.Claude will update its own settings. From that point on, it stops asking for permission on safe actions and just gets to work.
Plan Mode vs. Edit Mode
(and which model to pick)
Before you build anything, understand these two modes.
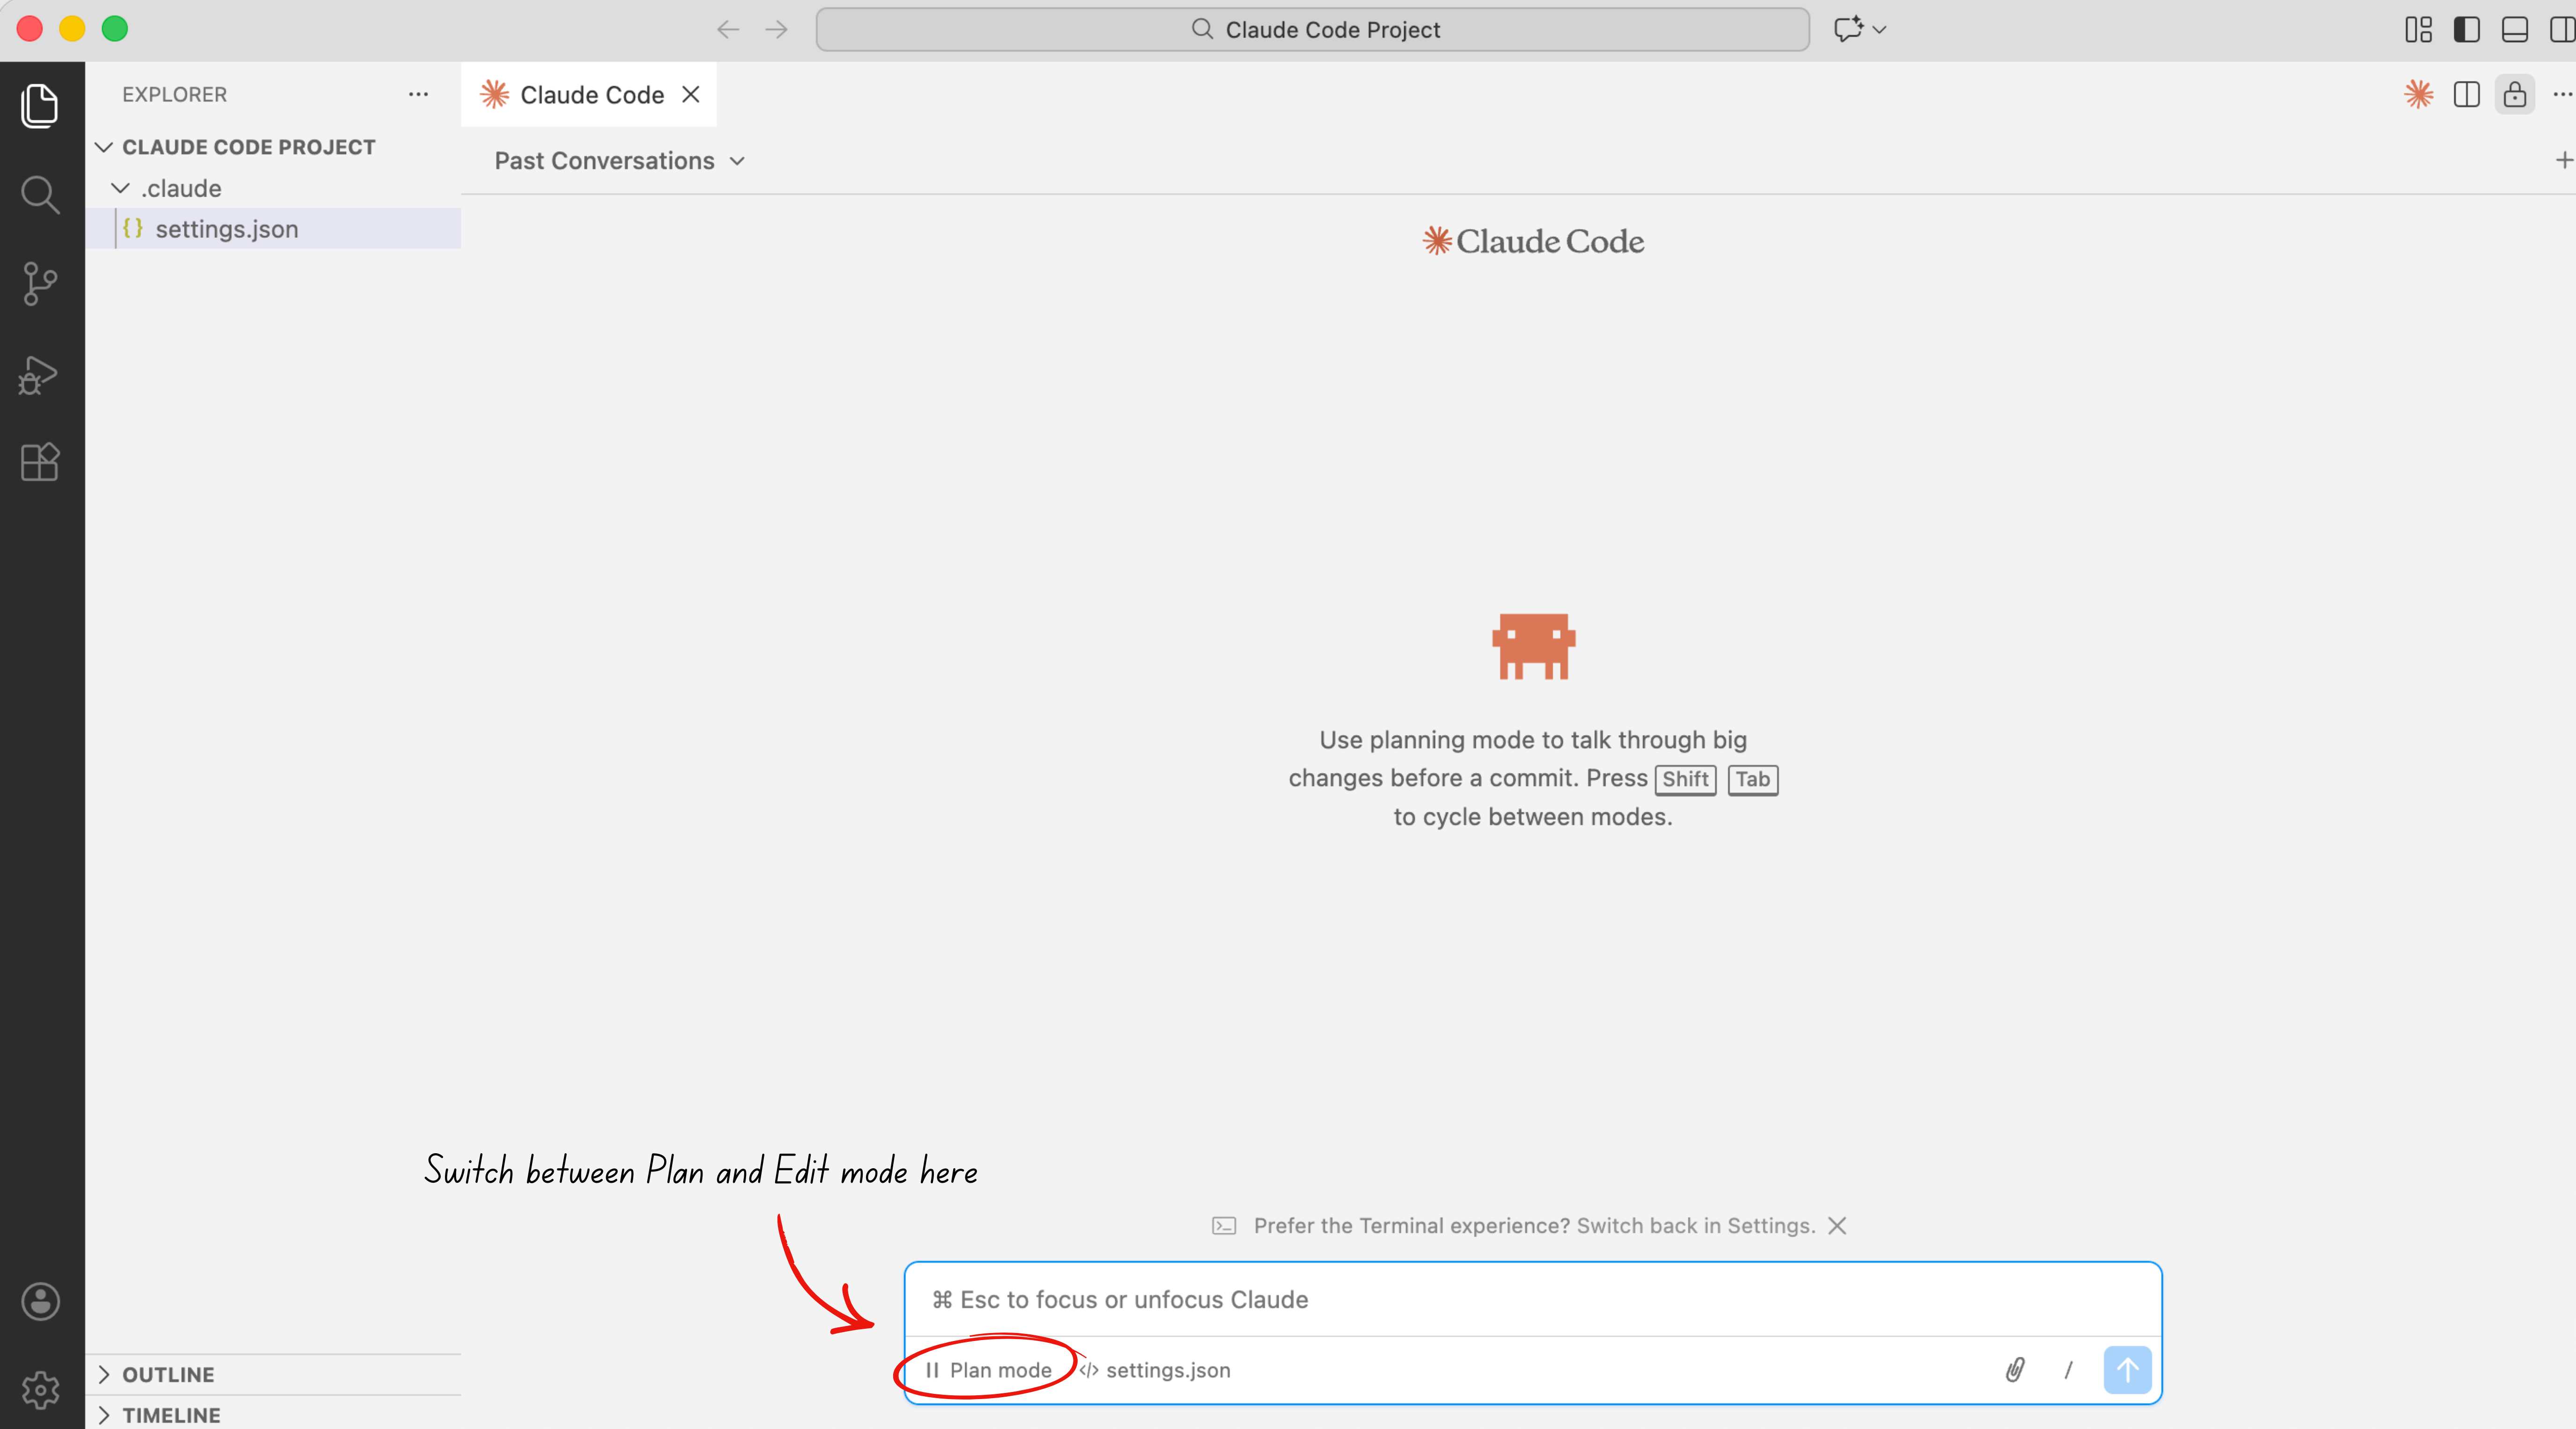
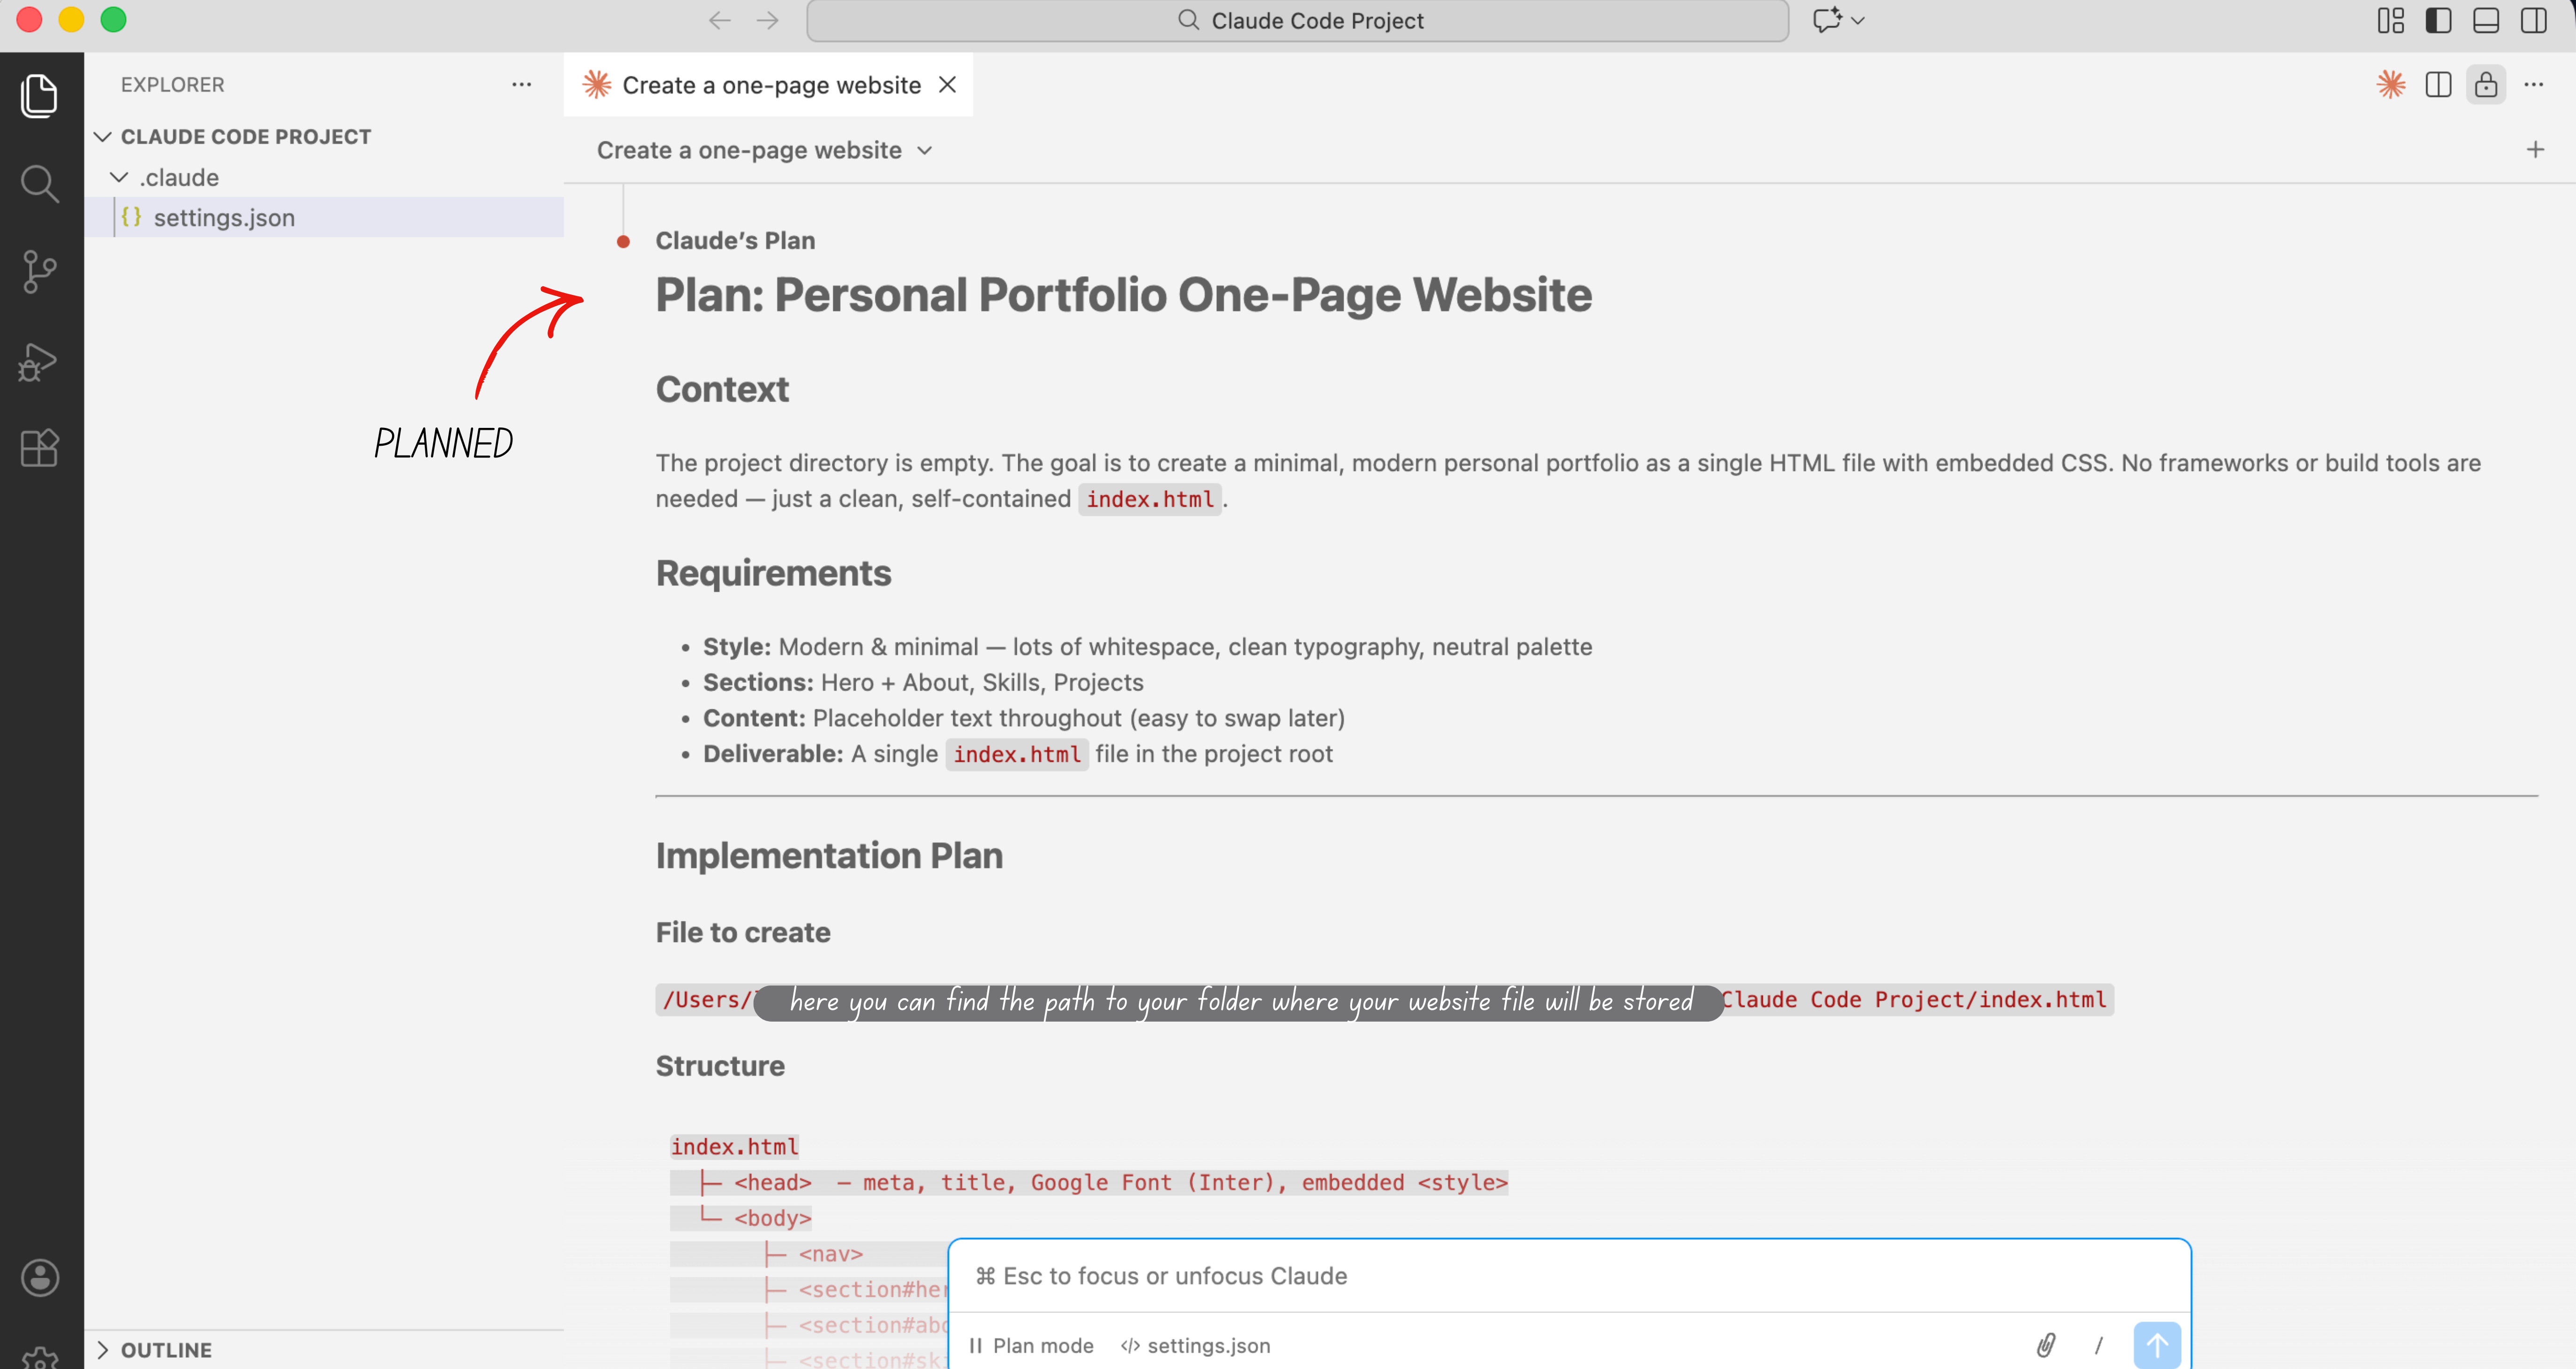
Plan Mode: Claude thinks out loud with you. It explains what it would do, in what order, and why. Your files stay untouched. Use this when you’re figuring out what you want.
Edit Mode: Claude actually builds. It writes files, creates folders, makes changes. Use this when you’re ready to go.
Switch between them using the toggle at the top of the Claude sidebar in VS Code. Depending on your version you will find the switch below your chat (see screenshot below).
Now, the part nobody tells you: you will burn through your credits faster than you think.
Even on the paid plan, Claude Code uses something called tokens. Think of tokens like coins in an arcade. Every word Claude reads or writes costs a coin. A long conversation costs more coins than a short one. When you run out, you wait until they refill.
This is why choosing the right model for the right task matters. Not all models cost the same.
Here’s the full breakdown, explained simply:
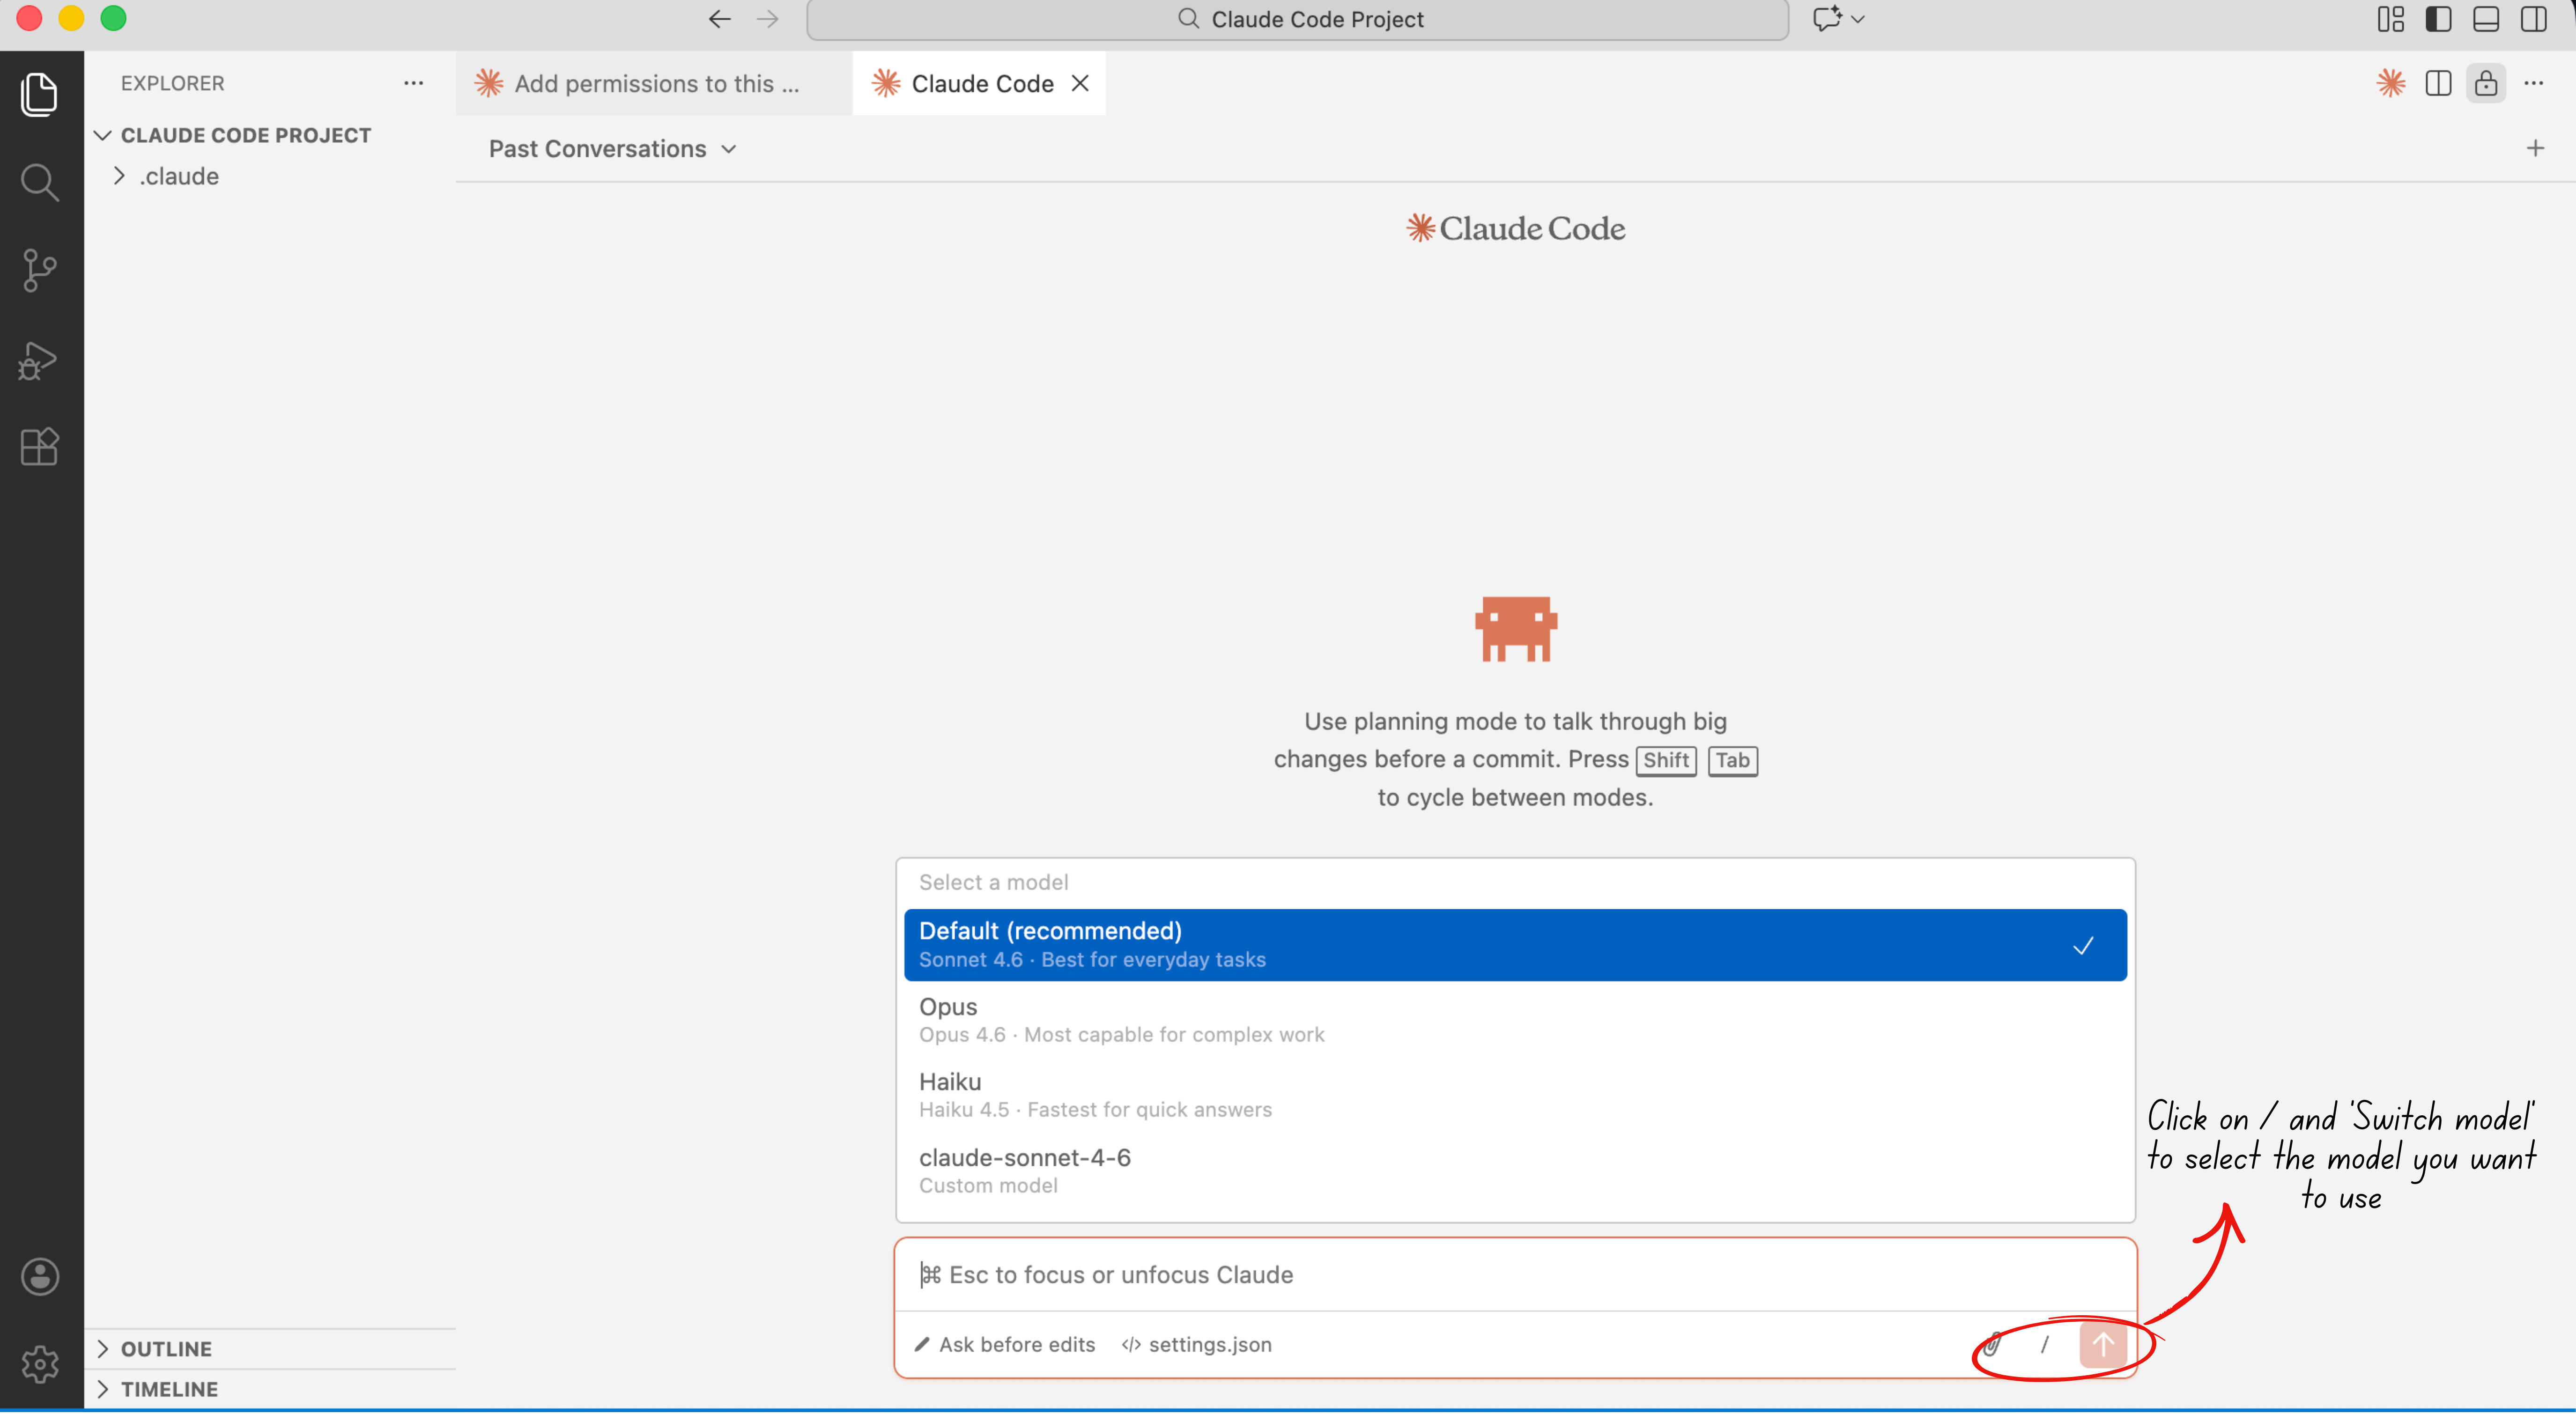
Claude Haiku — The cheap one.
Fast, lightweight, good for simple tasks. Think of it like a capable intern. Use it for quick edits, small rewrites, and basic questions. It costs roughly $0.001 per 1,000 words - so cheap you barely notice it.
Claude Sonnet — The reliable one.
This is your everyday workhorse. Smart enough for most real tasks, fast enough to not frustrate you, priced in the middle. Use it for building features, writing and editing code, and most of your actual project work. Costs around $0.003 per 1,000 words.
Claude Opus — The expensive one.
The smartest model, best for complex problems that require real reasoning. Think of it like hiring a senior consultant instead of a junior one - same firm, much higher rate. Use it only when Sonnet gets stuck or when the task genuinely requires deep thinking. Costs around $0.015 per 1,000 words - roughly 5x Sonnet.
My personal rule of thumb: use Haiku when you’re exploring or asking quick questions. Use Sonnet for 90% of your actual building. Switch to Opus only when Sonnet can’t solve the problem after two attempts.
Most people default to Opus for everything. That’s like taking a taxi to buy groceries - it works, but you’ll run out of money fast.
In Plan Mode, always use Haiku or Sonnet. You’re just thinking, not building. Save Opus for Edit Mode when the problem is genuinely hard.
Your first build
Open the chat and type what you want. In plain English. No special format needed.
“Create a one-page website for my consulting services.”
“Build me a simple expense tracker.”
“Make a weekly schedule template I can fill in.”
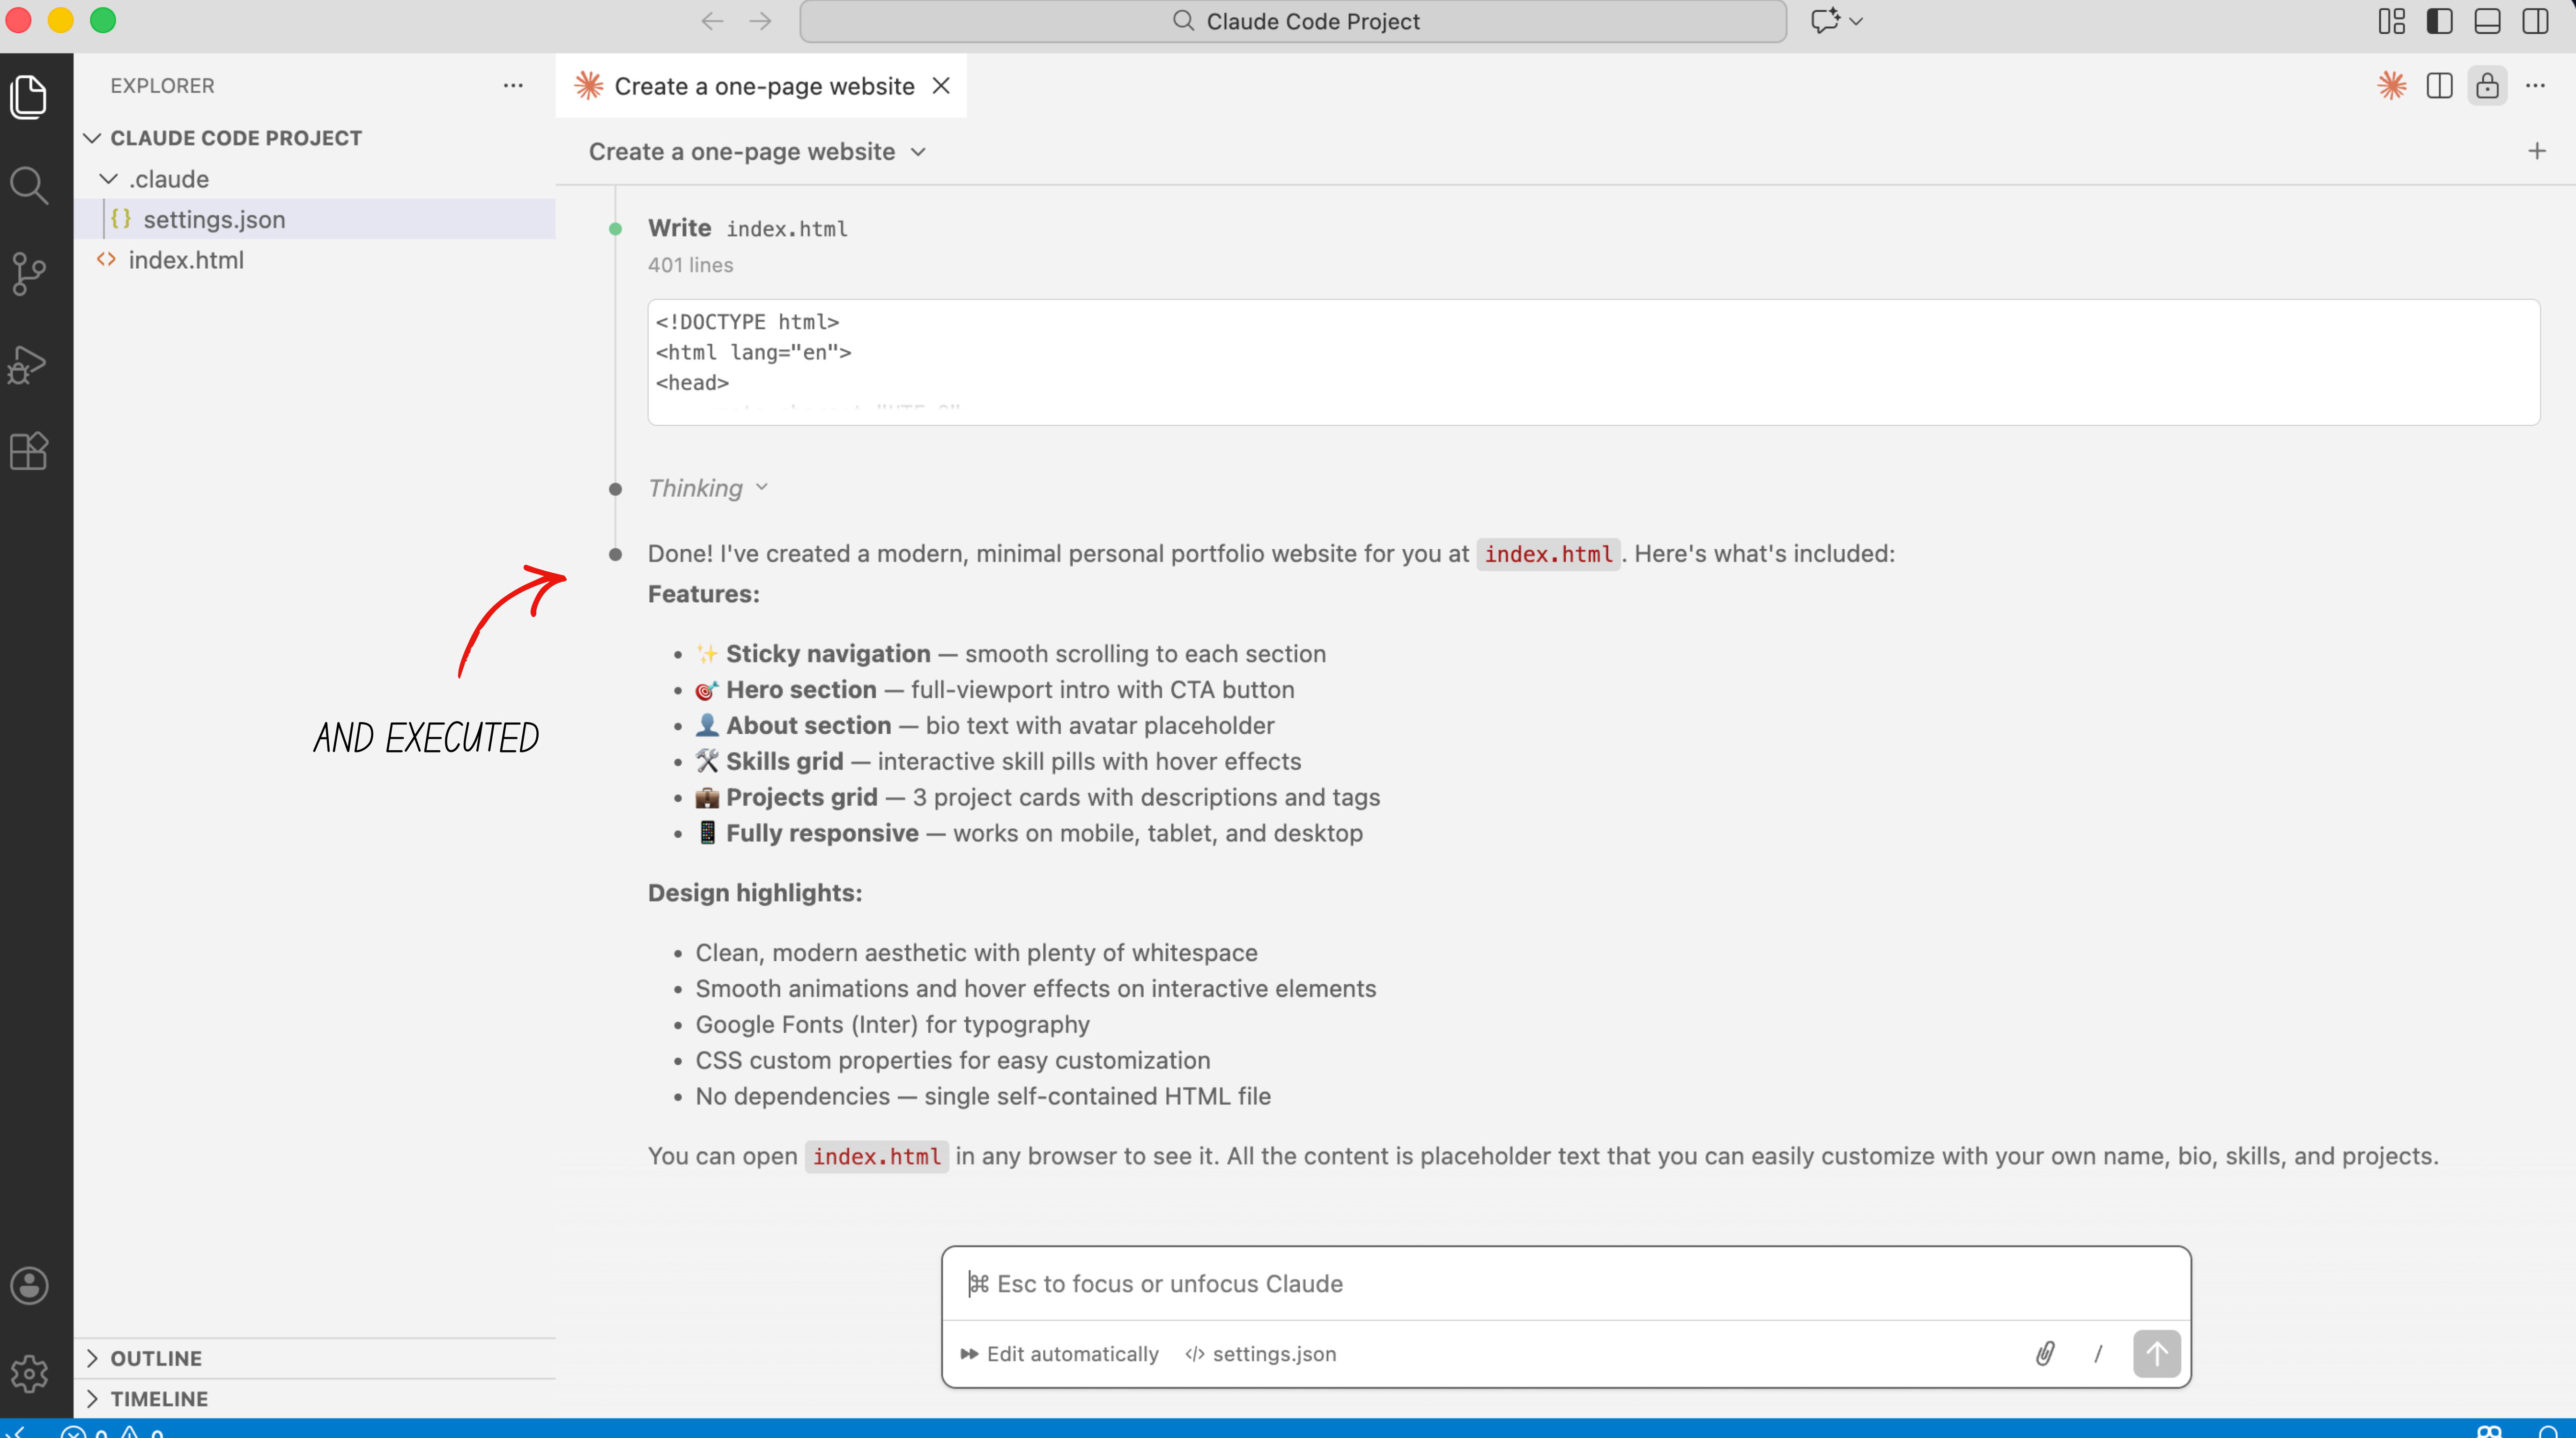
Claude will think for a few seconds, then start working. You’ll see files appear in your folder as it builds. When it’s done, it will tell you what it made and how to open it.
Switch from Plan mode to Edit mode if you did not give permission to edit automatically.
The memory file
(so Claude remembers you)
Every time you start a new chat, Claude forgets everything from before.
You’re curious why? I wrote about it here:

The memory file fixes this.
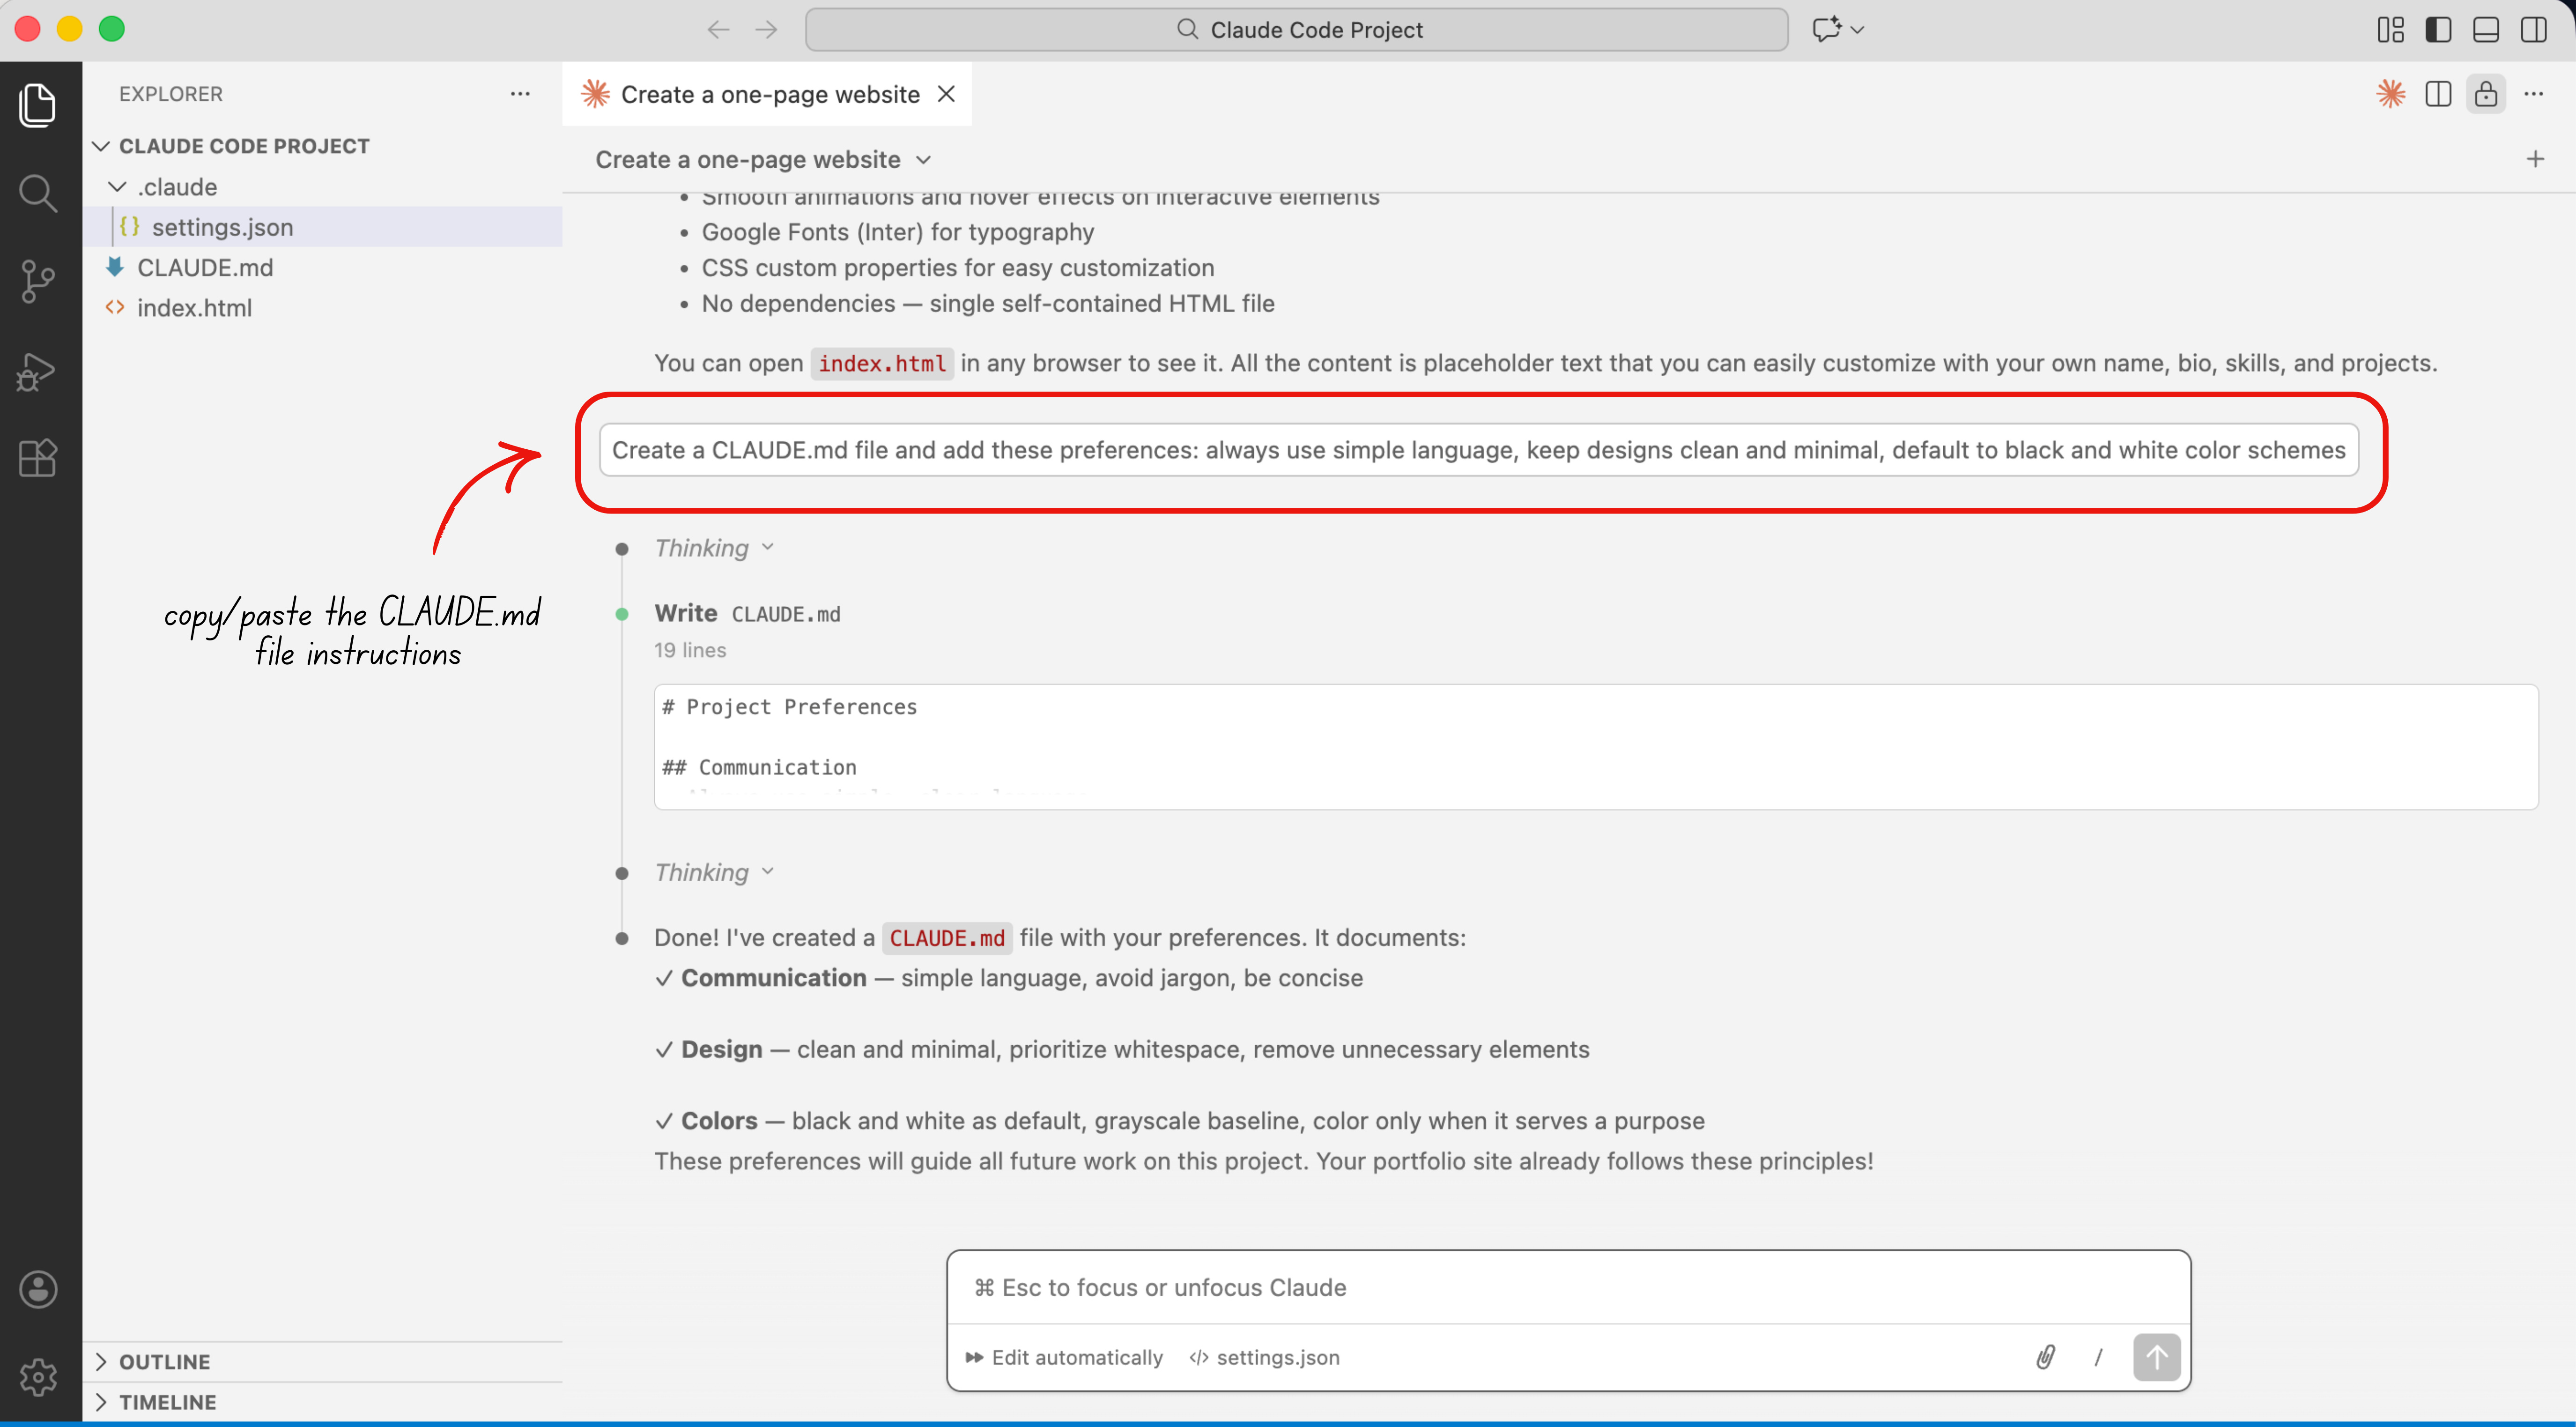
Ask Claude: “Create a CLAUDE.md file and add these preferences: always use simple language, keep designs clean and minimal, default to black and white color schemes.”
Now every new session, Claude reads that file first. It knows your rules before you say a word. You can update it any time by asking Claude to add new preferences.
Skills (the shortcut feature)
You can teach Claude reusable commands called Skills.
Example: teach it a
/summarizecommand that takes messy bullet points and formats them into a clean executive summary. You set it up once. After that, you type /summarize and it runs the whole thing automatically.
Ask Claude: “Create a skill called /summarize that takes raw bullet points and formats them into a professional executive summary.”
Claude saves the skill in your project folder. It’s ready to use every session from that point on.
Your checklist before you start:
✦ Claude Pro account → claude.ai ($20/month)
✦ VS Code installed → code.visualstudio.com (free)
✦ Claude Code extension installed → search inside VS Code
✦ Logged in via /login
✦ Project folder created and opened
✦ Permissions message sent once
✦ CLAUDE.md created with your preferences
✦ Model set to Sonnet (save Opus for when you’re stuck)
Open VS Code tonight. Type one sentence about what you want to build (comment below, I’m curious).
That’s how it starts.
P.S. - 3 ways to go deeper
Read my full Claude Agent skill setup guide (free) →
Next up: How to connect Claude Code to GitHub and make your projects professional
Coming soon: How to publish your website live using Vercel - so anyone in the world can see what you built

Stay tuned.
And let me know if you want a guide for any related topic, no matter how ‘beginner’ you think it is.
This article is part of my ongoing series on making AI simple and useful for non-tech people. Subscribe to get future articles on AI tools that actually matter for everyday life.