

Post Without Posting.
I’m not technical. I automated posting to Instagram, Facebook, Threads, and LinkedIn anyway. Here’s how.

You voted for this one last week. So here we go.
Social media automation sounds like a developer thing. It is not.
I’m non-technical. I don’t code. I’ve never built an app. And I now have automated posting set up across Instagram, Facebook, Threads, and LinkedIn. The accounts are live: @brisk.vision on Instagram and Threads, brisk.ai on Facebook, and brisk.ai on TikTok - all started few weeks ago to prove that this can be built and run without a developer.
And without paying for a 3rd party provider.
The setup sounds more complicated than it is. Stick with me.
0 - Start here: the Claude Code folder
Before you touch a single platform, build one folder.
If you’ve been reading brisk. for a while, you know I work inside Claude Code and try to rebuild everything for as little subscription money as possible.
Instead of starting from scratch every session, I have a project folder that Claude reads every time. It knows my brand, my platforms, my tone. I describe what I want. It runs.
Here’s the folder structure I recommend for a social media automation setup:
/social-automation/
│
├── CLAUDE.md                   ← tells Claude who you are and what to do
├── .env                        ← your API keys (more on this in a minute)
│
├── /content/
│   ├── /carousels/             ← images from the carousel workflow
│   ├── /images/                ← single-image posts
│   └── /captions/              ← text content, ready to post
│
├── /skills/
│   ├── carousel-generator.py   ← from my carousel article
│   └── image-generator.py      ← from my image stack article
│
├── /posting/
│   ├── threads-post.py
│   ├── instagram-post.py
│   ├── facebook-post.py
│   └── buffer-queue.py
│
└── /logs/
    └── post-log.json
Recap: what is a CLAUDE.md file?
It’s a plain text file that sits at the top of your project and briefs Claude on everything it needs to know. Your brand voice. Your platforms. Your posting schedule. What your skills do. Instead of re-explaining yourself every session, it just knows.
Think of it as the briefing document you’d give a new assistant. Except this one reads it in under a second.
→ I’m sharing my exact CLAUDE.md template as a resource for my subscribers.
What is a .env file?
A .env file - pronounced “dot env” - is where you store your API keys. An API key is a password for a tool or platform. You fill this file in once and your scripts read from it automatically.
It looks like this:
META_ACCESS_TOKEN=example_abc123yourtokenhere
META_PAGE_ID=example_123456789
INSTAGRAM_ACCOUNT_ID=example_987654321
BUFFER_ACCESS_TOKEN=example_def456yourtokenhere
One rule: never share this file. Don’t upload it to GitHub. Don’t paste it anywhere. It’s your master key.
1 - The easy ones: Meta platforms
Facebook, Instagram, and Threads all live inside the same developer system: Meta’s Graph API. You create one developer account, one app, and you get access to all three.
This is the best deal in social media automation.
Step A: Create your Meta developer account
Go to developers.facebook.com and sign up. You need a personal Facebook account to do this.
Once you’re in, click “Create App.” Select “Business” as the app type.
Note: My Meta developer account is a few years old. When I set this up, there was no approval process for personal use. If your account is brand new, Meta now technically requires “app review” before your app can be used by others - but for posting to your own accounts, you can stay in development mode and skip the review entirely. Development mode is all you need.
Step B: Add the products you need
Inside your app, add these three products:
→ Instagram Graph API
→ Facebook Pages API
→ Threads API
Step C: Understand the three things you need
Every platform API works with three pieces of information. Here’s what they mean in plain language:
App Secret - a password for your app. Never shared publicly.
Access Token - a temporary key that proves you’re authorised to post. Think of it like a session badge. Standard tokens expire after 1 hour. Long-lived tokens last 60 days.
Account ID / Page ID - the unique number for your account or page. Not your username. A number.
You’ll need all three for each platform.
Step D: Get your access token
Inside your Meta app, go to the Graph API Explorer (linked from your app dashboard). Connect your Instagram Business account and your Facebook Page. Request these permissions:
→ instagram_basic
→ instagram_content_publish
→ pages_manage_posts
→ pages_read_engagement
→ threads_basic
→ threads_content_publish
Generate a User Access Token. Then exchange it for a Long-Lived Token - this one lasts 60 days instead of 1 hour.
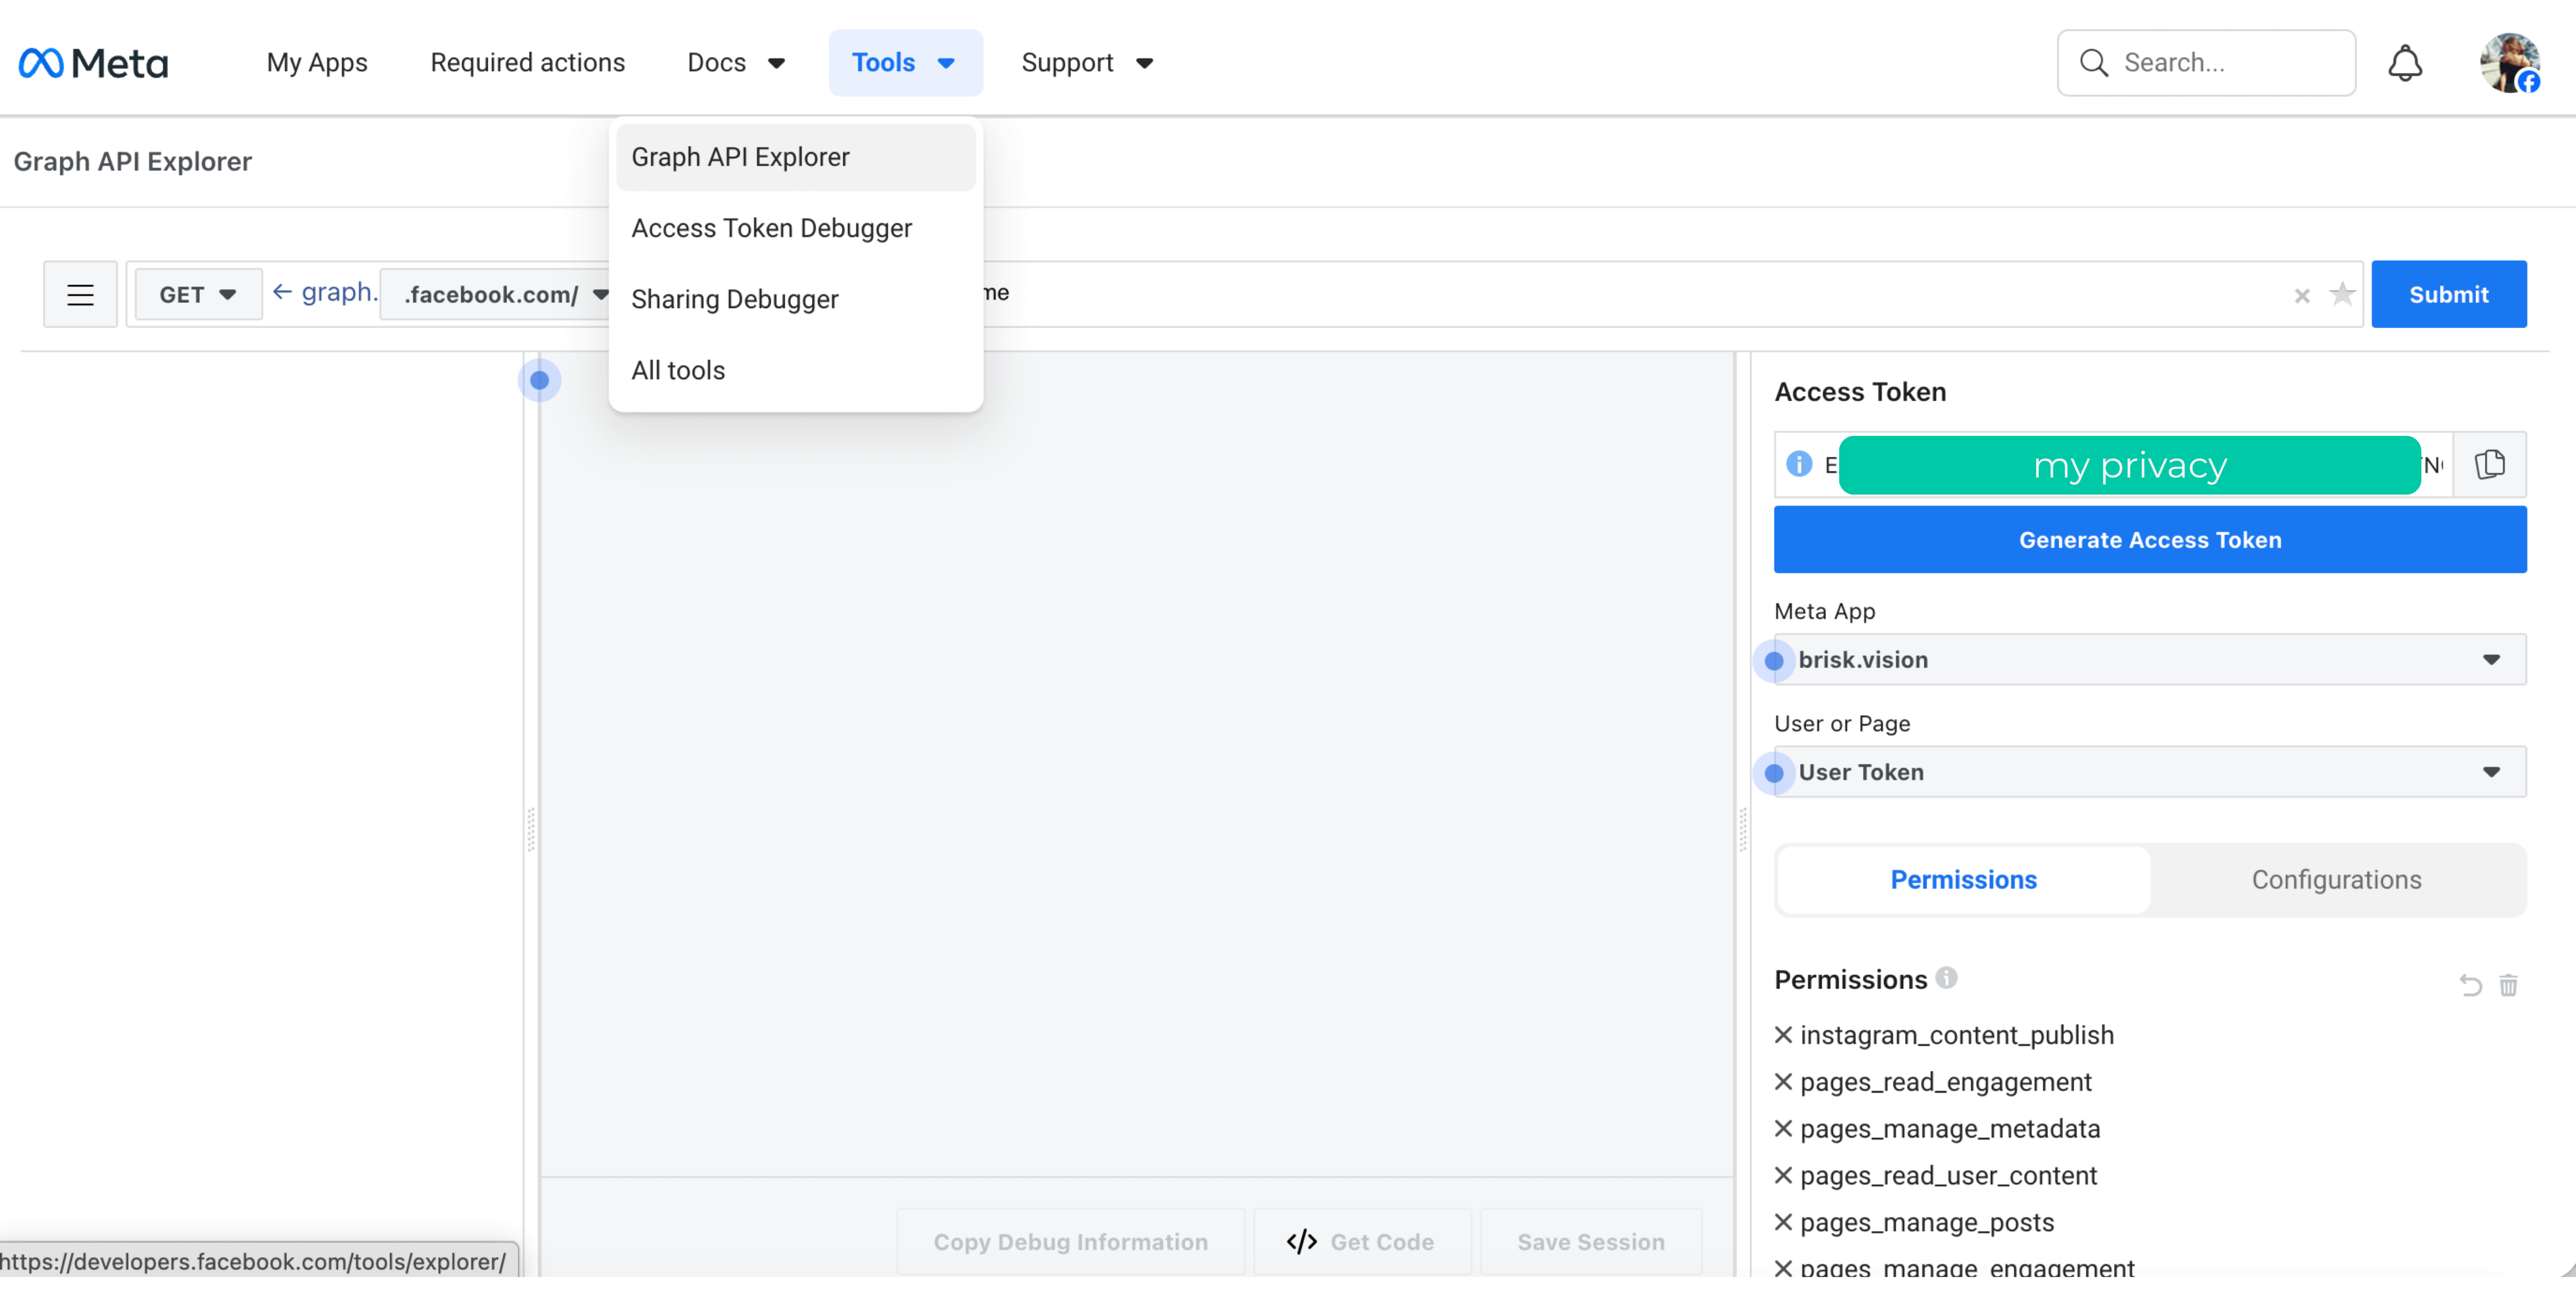
Technical flag: Long-lived tokens still expire every 60 days. You’ll need to refresh them. This is where having a developer, a Claude Code setup, or a tool like Blotato helps - the refresh can be automated so you don’t have to remember.
Step E: Find your Account IDs
→ Your Facebook Page ID: go to your Facebook Page, click About, scroll to Page Transparency.
→ Your Instagram Business Account ID: visible in the Graph API Explorer after connecting your account.
→ Your Threads User ID: also pulled from the Meta Graph API - separate from your Instagram ID, even though the accounts are linked.
Step F: Fill in your .env file
META_APP_ID=your_app_id
META_APP_SECRET=your_app_secret_never_share_this
META_ACCESS_TOKEN=your_long_lived_token
META_PAGE_ID=your_facebook_page_id
INSTAGRAM_ACCOUNT_ID=your_instagram_account_id
THREADS_USER_ID=your_threads_user_id
That’s it. Your posting scripts read from this file. You don’t paste keys around.
→ Full screenshot walkthrough of this entire setup - every screen, every click - is available for subscribers.
A. Threads - what to know
Threads uses the same Meta developer infrastructure as Instagram and Facebook. Same app, same token flow. The difference: it has its own permission scopes (threads_basic, threads_content_publish) and its own User ID - separate from your Instagram ID.
One limitation worth knowing: the Threads API only publishes immediately. There’s no native “post at 9am” option built in. If you want to schedule, your script needs to run at the right time - which Claude Code can handle with a scheduled task (just ask Claude Code to set this up in the chat interface).
Text posts up to 500 characters, single images, single videos, and carousels up to 20 items all work. GIFs and Stories are not supported via the API.
B. Facebook - the easiest of the three
The Pages API is the most straightforward of all the Meta products. Images, text, video, and scheduled posts all work out of the box.
One thing to know: API publishing only works for Facebook Pages, not personal profiles. If you haven’t already, create a Page for your brand. That’s what you connect.
C. Instagram - what works and what doesn’t
Images, carousels, and single videos: fully automatable.
Reels with trending or licensed music: not automatable via the standard API. Meta blocks music permissions at the API level. This is a known limitation.
Why does this matter?
Trending music is not just aesthetic. Instagram’s algorithm treats posts with trending audio differently. Even carousels - not just videos - can appear in the Explore and Reels discovery section when they carry trending audio. That’s the difference between content that only reaches your existing followers and content that reaches people who don’t know you yet. It’s a genuine growth lever.
My developer friend found an open-source solution that incorporates trending audio into the automated posting flow. We are currently testing it. If it holds up, I’ll share the full details and the GitHub link in a later article. Watch this space.
Bonus tip: Instagram to Facebook cross-posting
If Facebook is not a priority channel for you but you want presence there, you can configure your posting script to mirror Instagram posts to your linked Facebook Page automatically. One API call, two platforms. Worth setting up if you don’t want to create separate Facebook content.
2 - The medium one: LinkedIn
LinkedIn has an official API. It requires enterprise-level partner approval to access for posting. That’s not for individual creators.
The workaround: Buffer.
Buffer is a social media scheduling tool. It has its own open API, and it connects to LinkedIn. The flow is: your Claude Code script sends content to Buffer, Buffer posts it to LinkedIn on schedule. Buffer is the middleman - and in this case, the middleman does all the hard work.
Buffer’s free plan covers 3 connected social accounts and up to 10 scheduled posts. That’s enough to test the whole setup. Paid plans start at around $6/month per channel if you need more volume.
Step A: Create a Buffer account and connect LinkedIn
Sign up at buffer.com. Connect your LinkedIn profile inside Buffer’s dashboard. This is a standard login flow - no developer account needed.
Step B: Get your Buffer access token
Go to buffer.com/developers and create an app. You’ll get an Access Token. Copy it.
Step C: Get your LinkedIn Profile ID from Buffer
Buffer shows you all connected accounts and their IDs after you connect LinkedIn. Copy your profile ID.
Step D: Fill in your .env file
BUFFER_ACCESS_TOKEN=your_buffer_token
BUFFER_LINKEDIN_PROFILE_ID=your_linkedin_profile_id
Step E: Send posts via API
Your posting script sends content to Buffer’s API endpoint:
POST https://api.bufferapp.com/1/updates/create.jsonThe post appears in your LinkedIn queue. Buffer publishes it at the scheduled time.
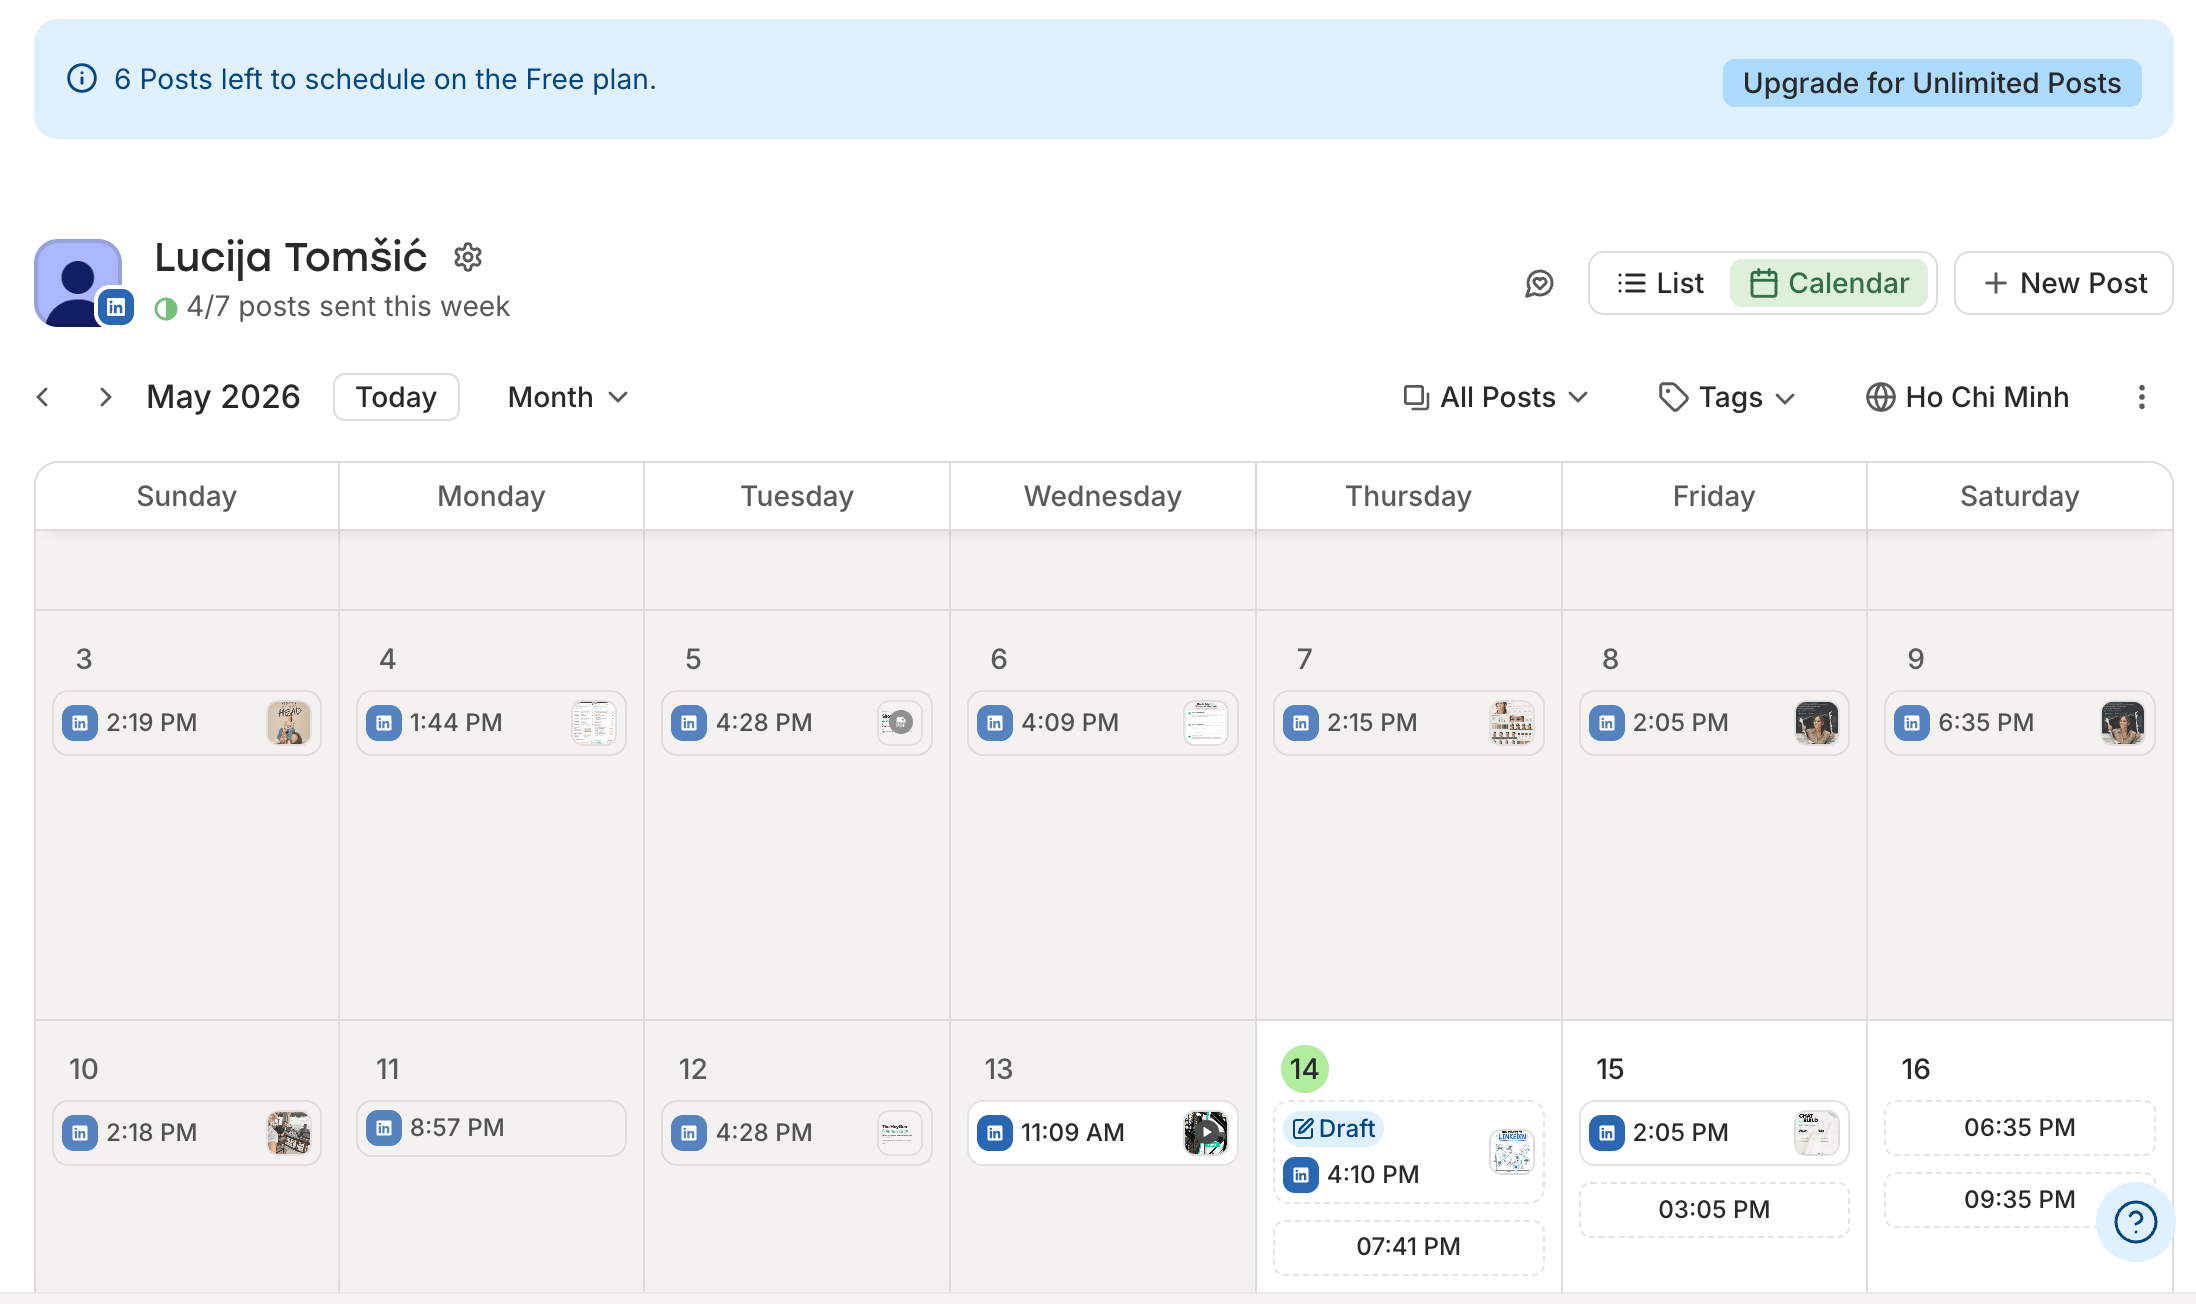
What you can automate: post text, images, scheduling. What you still can’t automate: LinkedIn analytics. That’s still a manual CSV export for now.
3 - The partial one: Substack
Substack has an API. It’s useful - but not for posting.
You can use it to read your own analytics, pull subscriber data, and monitor other newsletters. Competitor research, performance tracking. Genuinely useful for content strategy.
What it won’t do: schedule Notes, automate publishing, queue anything.
Notes must be posted manually. A custom script is technically possible but requires a developer or solid Claude Code skills.
Next issue:
I’ll show you exactly how to use the Substack API for competitive research and analytics. It’s more interesting than it sounds.
4 - The ones not worth it (for now)
TikTok and Pinterest
Both platforms have APIs. Both require you to submit a developer application and demonstrate a working use case in a sandbox environment before getting access. A sandbox is a testing environment - you essentially have to prove your integration works before they let you touch the real platform.
This is a genuine developer process. If you don’t have a developer or a solid Claude Code setup, don’t start here.
Claude can write all your TikTok scripts and Pinterest captions. The posting stays manual.
X / Twitter
As of February 2026, X moved to pay-per-use pricing for all new developer accounts. Posting a single link costs $0.20 per post. Old flat-rate plans still exist for accounts that subscribed before the change, but new accounts pay per call. At any meaningful volume, this doesn’t make financial sense.
Skip it unless you’re already heavily invested.
This is where Blotato comes in.
Sabrina Ramonov 🍄 built Blotato because this patchwork of API applications, sandbox demos, and developer approvals is exactly what keeps non-technical creators stuck. She grew to 2.2M followers and 500M views without a team - and Blotato is the system she used and productized. Also she is educating basically the entire world on how to use AI for FREE.
(Big fan here 🙋♀️)
Blotato handles TikTok, Pinterest, Instagram, Facebook, LinkedIn, Threads, X, YouTube, Bluesky, and more. No app review. No sandbox demo. No developer. You connect your accounts through a normal login flow and it (she) handles the rest. AI writing is included. So are AI image generation, AI video creation, viral templates, and a scheduling calendar.
Plans start at $29/month (Starter). Creator is $97/month. There’s a 7-day free trial on every plan, no credit card required: blotato.com
The honest summary
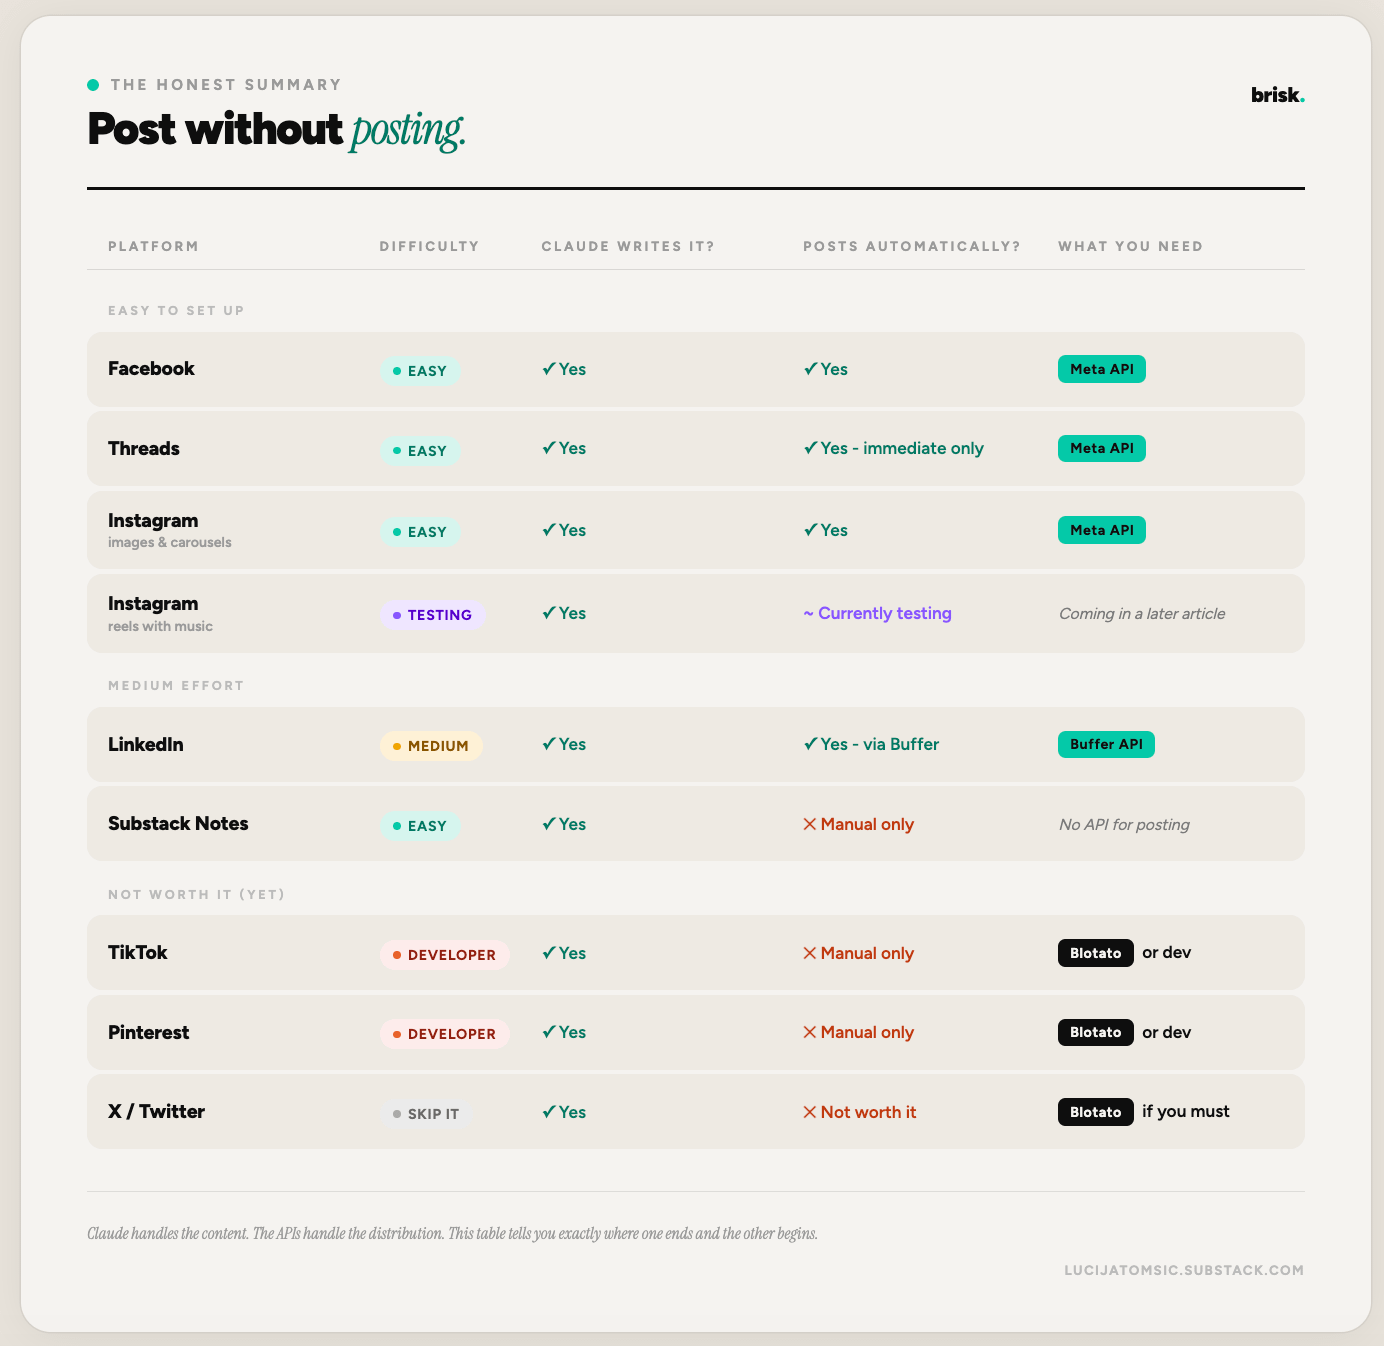
Claude handles the content. The APIs handle the distribution. The table tells you exactly where one ends and the other begins.
The three subscriber resources for this article:
→ The .env setup sheet: every variable named and explained, with a checklist of where to find each value.
→ Full screenshot walkthrough of the Meta API setup - every screen, every click.
→ The social-automation starter folder: CLAUDE.md pre-filled, .env template, skeleton posting scripts with comments. Download, fill in your keys, start posting.
Start with Meta. Get Facebook, Instagram, and Threads running off one setup. Then add Buffer for LinkedIn. That’s already four platforms posting automatically while you do something else.
The rest can wait.

PS - Let me know how it goes. I encourage you to share and ask questions if something wasn’t clear enough.
Also don’t be shy and follow me on my new channels. Let’s grow together:
Subscribers get three resources for this article:
→ The .env setup sheet: every variable named and explained, with a checklist of where to find each value.
→ Full screenshot walkthrough of the Meta API setup - every screen, every click.
→ The social-automation starter folder: CLAUDE.md pre-filled, .env template, skeleton posting scripts with comments. Download, fill in your keys, start posting.
You are not a subscriber? Change it now!
This article is part of my ongoing series on making AI simple and useful for non-tech people. Subscribe to get future articles on AI tools that actually matter for everyday life. And if you found something that helped you - sharing is caring 😉